一,碎片的简单用法
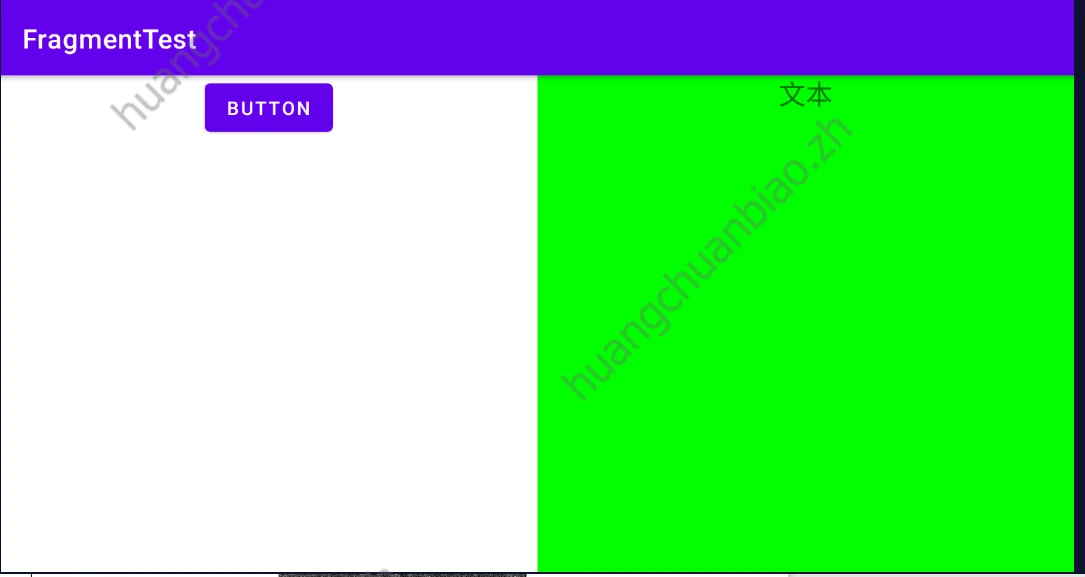
在一个活动中添加两个碎片,并且让这两个碎片平分活动空间。
第一步:首先在layout中创建 left_fragment.xml:
<LinearLayout xmlns:android="http://schemas.android.com/apk/res/android" android:orientation="vertical" android:layout_width="match_parent" android:layout_height="match_parent"> <Button android:id="@+id/button" android:layout_width="wrap_content" android:layout_height="wrap_content" android:layout_gravity="center_horizontal" android:text="button"/> </LinearLayout> 和right_fragment:
<LinearLayout xmlns:android="http://schemas.android.com/apk/res/android" android:orientation="vertical" android:background="#00ff00" android:layout_width="match_parent" android:layout_height="match_parent"> <TextView android:layout_width="wrap_content" android:layout_height="wrap_content" android:layout_gravity="center_horizontal" android:textSize="20sp" android:text="文本"></TextView> </LinearLayout> 第二步:创建leftFragment.class和rightFragment.class类
public class LeftFragment extends Fragment {
    @Nullable @Override public View onCreateView(@NonNull LayoutInflater inflater, @Nullable ViewGroup container, @Nullable Bundle savedInstanceState){
    View view=inflater.inflate(R.layout.left_fragment,container,false); return view; } }
和:
public class RightFragment extends Fragment {
    @Nullable @Override public View onCreateView(@NonNull LayoutInflater inflater, @Nullable ViewGroup container, @Nullable Bundle savedInstanceState) {
    View view=inflater.inflate(R.layout.left_fragment,container,false); return view; } }
第三步:修改mainActivity.xml文件,通过name引入使用
<LinearLayout xmlns:android="http://schemas.android.com/apk/res/android" android:orientation="horizontal" android:layout_width="match_parent" android:layout_height="match_parent"> <fragment android:id="@+id/left_fragment" android:name="com.example.fragmenttest.LeftFragment" android:layout_weight="1" android:layout_width="0dp" android:layout_height="match_parent" /> <fragment android:id="@+id/right_fragment" android:name="com.example.fragmenttest.RightFragment" android:layout_weight="1" android:layout_width="0dp" android:layout_height="match_parent" /> </LinearLayout> 实现的效果:

这看起来和前端中的组件并无甚不同。
二,动态地添加碎片
1,第一步:创建待添加的碎片实例another_right_fragment.xml:
<LinearLayout xmlns:android="http://schemas.android.com/apk/res/android" android:orientation="vertical" android:background="#ffff00" android:layout_width="match_parent" android:layout_height="match_parent"> <TextView android:layout_width="wrap_content" android:layout_height="wrap_content" android:layout_gravity="center_horizontal" android:text="另一个碎片" android:textSize="20sp"/> </LinearLayout> 2,第二步:修改mainActivity.xml
就是在LinearLayout布局下嵌套FrameLayout布局:
<LinearLayout xmlns:android="http://schemas.android.com/apk/res/android" android:orientation="horizontal" android:layout_width="match_parent" android:layout_height="match_parent"> <fragment android:id="@+id/left_fragment" android:name="com.example.fragmenttest.LeftFragment" android:layout_weight="1" android:layout_width="0dp" android:layout_height="match_parent" /> <FrameLayout android:id="@+id/right_layout" android:layout_weight="1" android:layout_width="0dp" android:layout_height="match_parent" /> </LinearLayout> 3,在mainActivity.class主活动中修改
也就是默认在右边的碎片中先渲染一个碎片,然后通过点击按钮切换FrameLayout容器中的碎片。
public class MainActivity extends AppCompatActivity implements View.OnClickListener{
    @Override protected void onCreate(Bundle savedInstanceState) {
    super.onCreate(savedInstanceState); setContentView(R.layout.activity_main); //右侧活动初始展示的碎片 replaceFragment(new RightFragment()); //点击左侧的按钮 Button button =(Button) findViewById(R.id.button); button.setOnClickListener(this); } @Override public void onClick(View view) {
    switch(view.getId()){
    case R.id.button: replaceFragment(new AnotherRightFragment()); break; default: break; } } private void replaceFragment(Fragment fragment) {
    //1,创建新的碎片实例new AnotherRightFragment() //2,获取FragmentManager FragmentManager fragmentManager =getSupportFragmentManager(); //3,通过beginTransaction()开启一个事务 FragmentTransaction transaction=fragmentManager.beginTransaction(); //4,向容器内添加事务,(容器的id,待添加的碎片实例) transaction.replace(R.id.right_layout,fragment); //提交事务才能完成 transaction.commit(); } }
4,在碎片中模拟返回栈
 private void replaceFragment(Fragment fragment) {
    //1,创建新的碎片实例new AnotherRightFragment() //2,获取FragmentManager FragmentManager fragmentManager =getSupportFragmentManager(); //3,通过beginTransaction()开启一个事务 FragmentTransaction transaction=fragmentManager.beginTransaction(); //4,向容器内添加事务,(容器的id,待添加的碎片实例) transaction.replace(R.id.right_layout,fragment); //将事务添加到返回栈中,一般传入null就行,这样碎片中的活动就会和已经加入返回栈中一样 transaction.addToBackStack(null); //提交事务才能完成 transaction.commit(); }
这样一来,就好像碎片内的活动都在返回栈中似的。
5,碎片和活动之间进行通信
虽然碎片嵌套于活动中,可是实际上他们的关系并没有那么亲密。可以看到碎片和活动都是各自存在于一个独立的类当中,它们之间并没有那么明显的方式来直接进行通信。
那如果现在我想要在活动中调用碎片中的方法,或者碎片中调用活动的方法。应该如何实现?
FragmentManager 提供了一个类似于 findViewById()的方法,专门用于从布局文件中获取碎片的实例,代码如下所示:
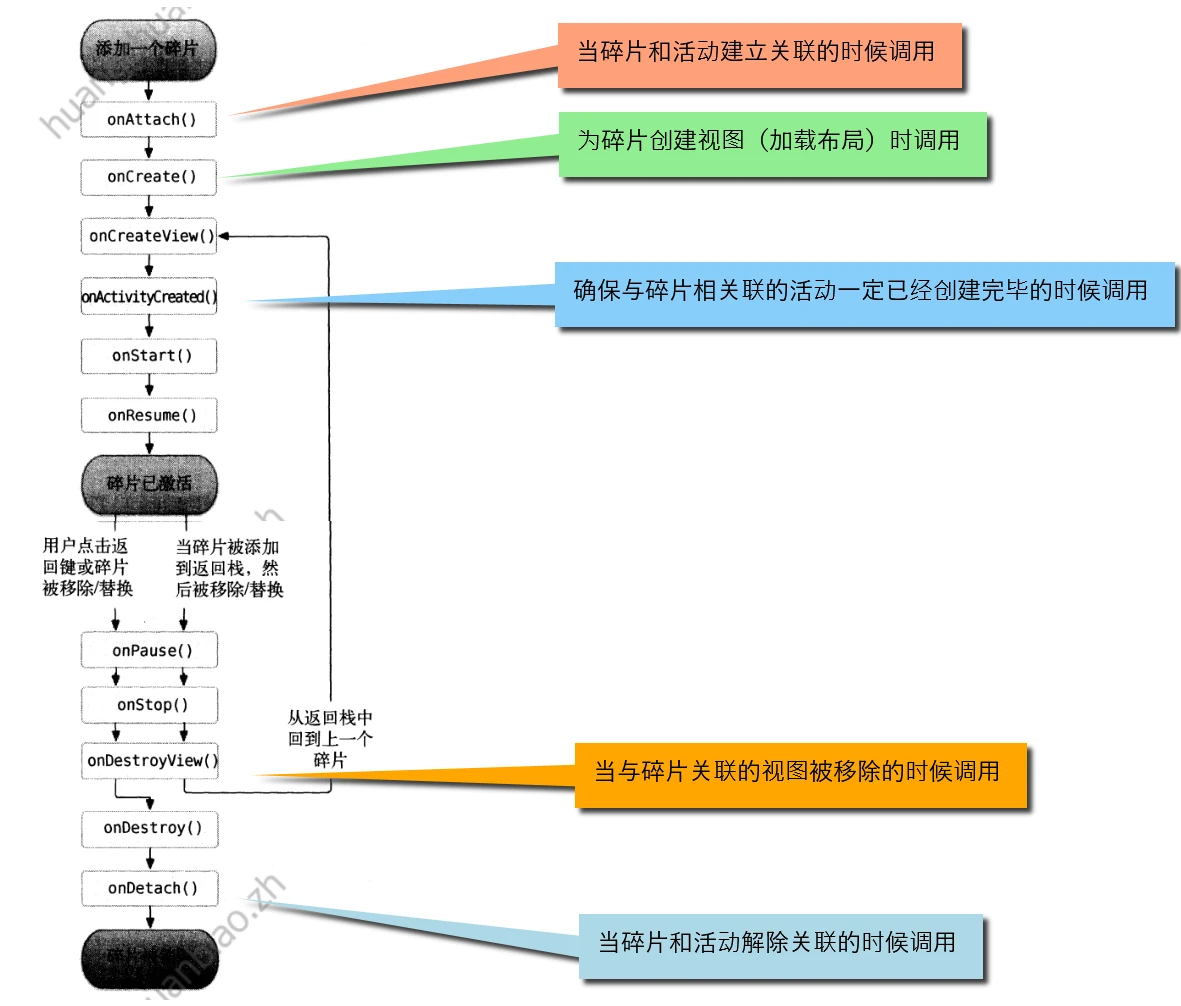
RightFragment rightFragment = (RightFragment) getFragmentManager().findFragmentById(R.id.right fragment); MainActivity activity = (MainActivity) getActivity(); 三,碎片的生命周期

四,动态加载布局的技巧
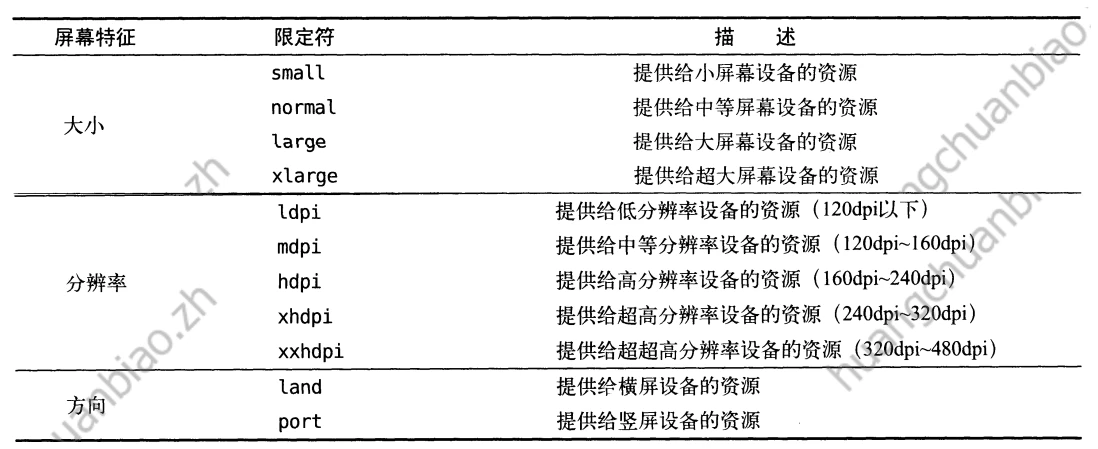
1,使用限定符
使用限定符,可以让程序判断当前程序运行的环境,从而使用单页模式还是双页模式。

例如:但我们手机要显示一个页面,而宽屏的平板需要显示两个页面平铺时,就可以:
首先在layout/activity_main.xml中书写正常的单页模式的布局。
然后res下新建文件夹:layout-large,新建同名文件activity_main.xml。书写平板的双屏布局。
等程序运行之后,就会判断环境,平板时读取layout-large中的代码,否则读取layout中的代码。
2,使用最小宽度限定符
五,碎片的最佳应用
如果像上文那样,每个设备都写一套代码,工作量巨大后续维护也会困难。
第一步:在build.gradle引入recycleview
dependencies {
    implementation 'androidx.recyclerview:recyclerview:1.1.0' }
第二步:准备一个新闻实体类News:
public class News {
    public String title; public String content; public String getTitle(){
    return title; } public void setTitle(String title) {
    this.title = title; } public String getContent() {
    return content; } public void setContent(String content) {
    this.content = content; } }
第三步:新建布局文件news_content_frag.xml
<RelativeLayout xmlns:android="http://schemas.android.com/apk/res/android" android:layout_width="match_parent" android:layout_height="match_parent"> <LinearLayout android:id="@+id/visibility_layout" android:layout_width="match_parent" android:layout_height="match_parent" android:orientation="vertical" android:visibility="invisible"> <TextView android:id="@+id/news_title" android:layout_width="match_parent" android:layout_height="wrap_content" android:gravity="center" android:padding="10dp" android:textSize="20sp"/> <View android:layout_width="match_parent" android:layout_height="1dp" android:background="#000"/> <TextView android:id="@+id/news_content" android:layout_width="match_parent" android:layout_height="0dp" android:layout_weight="1" android:padding="15dp" android:textSize="18sp"/> </LinearLayout> <View android:layout_width="1dp" android:layout_height="match_parent" android:layout_alignParentLeft="true" android:background="#000"/> </RelativeLayout> 新闻内容的布局主要分为两个部分,头部显示新闻标题,正文显示新闻内容,中间使用一条细线分隔开。
第四步:新建一个NewsContentFragment类:
package com.example.fragmenttest; import android.os.Bundle; import android.view.LayoutInflater; import android.view.View; import android.view.ViewGroup; import android.widget.TextView; import androidx.fragment.app.Fragment; public class NewsContentFragment extends Fragment {
    private View view; public View onCreateView(LayoutInflater inflater, ViewGroup container, Bundle savedInstanceState) {
    //加载新闻布局 view = inflater.inflate(R.layout.news_content_frag, container, false); return view; } / * 将新闻标题和新闻内容显示在界面上 用来刷新新闻详情 */ public void refresh(String newsTitle, String newsContent) {
    View visibilityLayout = view.findViewById(R.id.visibility_layout); visibilityLayout.setVisibility(View.VISIBLE);//把visibilityLayout设置成可见 TextView newsTitleText = (TextView) view.findViewById(R.id.news_title);//获取新闻标题控件 TextView newsContentText = (TextView) view.findViewById(R.id.news_content);//获取新闻正文控件 newsTitleText.setText(newsTitle);//刷新新闻标题 newsContentText.setText(newsContent);//刷新新闻内容 } }
首先在onCreateView()方法里加载了我们刚刚创建的news content frag布局,这个没什么好解释的。接下来又提供了一个 refresh()方法,这个方法就是用于将新闻的标题和内容显示在界面上的。可以看到,这里通过 findViewBvId)方法分别获取到新闻标题和内容的控件,然后将方法传递进来的参数设置进去。
这样新闻内容的碎片fragment类文件和xml布局就创建好了。
但是他们都是在双页模式下使用的。如果想要在单页模式下使用的话。还需要再创建一个活动。
第五步:新建NewsContentActivity文件
会自动创建对应的news_content.xml文件,修改为:
<LinearLayout xmlns:android="http://schemas.android.com/apk/res/android" android:orientation="vertical" android:layout_width="match_parent" android:layout_height="match_parent" > <fragment android:id="@+id/news_content_fragment" android:layout_width="match_parent" android:layout_height="match_parent" android:name="com.example.fragmenttest.NewsContentFragment"/> </LinearLayout> public class NewsContentActivity extends AppCompatActivity {
/ * 构建Intent,传递所需数据 */ public static void actionStart(Context context, String newsTitle, String newsContent){
Intent intent = new Intent(context,NewsContentActivity.class); intent.putExtra("news_title",newsTitle); intent.putExtra("news_content",newsContent); context.startActivity(intent); } @Override protected void onCreate(Bundle savedInstanceState) {
super.onCreate(savedInstanceState); setContentView(R.layout.news_content); //获取传入的新闻标题、新闻内容 String newsTitle = getIntent().getStringExtra("news_title"); String newsContent = getIntent().getStringExtra("news_content"); //获取NewsContentFragment 实例 NewsContentFragment newsContentFragment = (NewsContentFragment) getSupportFragmentManager().findFragmentById(R.id.news_content_fragment); //刷新NewsContentFragment 显示数据 newsContentFragment.refresh(newsTitle,newsContent); } } 在 onCreate() 方法中通过 Intent 获取传入的新闻标题和内容
然后调用 FragmentManager 的 findFragmentById() 方法得到 NewsContentFragment 的实例
接着调用它的 refresh() 方法,并将新闻的标题和内容传入,显示数据
第六步:创建新闻列表的布局 news_title_frag.xm
接下来还需再创建显示新闻列表的布局 news_title_frag.xml,如下:
<LinearLayout xmlns:android="http://schemas.android.com/apk/res/android" android:orientation="vertical" android:layout_width="match_parent" android:layout_height="match_parent"> <!--新闻列表--> <android.support.v7.widget.RecyclerView android:id="@+id/news_title_recycler_view" android:layout_width="match_parent" android:layout_height="match_parent" /> </LinearLayout> 第七步:新建 news_item.xml 作为 上述 RecyclerView 子项的布局
<TextView xmlns:android="http://schemas.android.com/apk/res/android" android:id="@+id/news_title" android:layout_width="match_parent" android:layout_height="wrap_content" android:singleLine="true" android:ellipsize="end" android:textSize="18sp" android:padding="10dp"/> 子项的布局就只有一个 TextView
新闻列表和子项布局都创建好了,接下来就需要一个用于展示新闻列表的地方
这里新建 NewsTitleFragment 作为展示新闻列表的碎片:
/ * 新闻列表fragment */ public class NewsTitleFragment extends Fragment{
    private boolean isTowPane; @Override public View onCreateView(LayoutInflater inflater, ViewGroup container, Bundle savedInstanceState) {
    View view = inflater.inflate(R.layout.news_content_frag, container, false); return view; } @Override public void onActivityCreated(@Nullable Bundle savedInstanceState) {
    super.onActivityCreated(savedInstanceState); if (getActivity().findViewById(R.id.news_content_layout)!= null){
    // 可以找到 news_content_layout 布局时,为双页模式 isTowPane = true; }else {
    // 找不到 news_content_layout 布局时,为单页模式 isTowPane = false; } } }
为实现上述 onActivityCreated() 方法中判断当前时双页还是单页模式
接下来在 NewsTitleFragemt 中新建一个内部类 NewsAdapter 来作为 RecyclerView 的适配器
如下:
public class NewsTitleFragment extends Fragment{
    private boolean isTowPane; . . . / * RecyclerViews适配器 * */ class NewsAdapter extends RecyclerView.Adapter<NewsAdapter.ViewHolder> {
    private List<News> mNewsList; class ViewHolder extends RecyclerView.ViewHolder {
    TextView newsTitleText; public ViewHolder(View view) {
    super(view); newsTitleText = (TextView) view.findViewById(R.id.news_title);//新闻标题 } } public NewsAdapter(List<News> newsList) {
    mNewsList = newsList; } @Override public ViewHolder onCreateViewHolder(ViewGroup parent, int viewType) {
    //加载布局 View view = LayoutInflater.from(parent.getContext()).inflate(R.layout.news_item, parent, false); //每个Item的点击事件 final ViewHolder holder = new ViewHolder(view); view.setOnClickListener(new View.OnClickListener() {
    @Override public void onClick(View v) {
    News news = mNewsList.get(holder.getAdapterPosition()); //如果是双页模式,则刷新NewsContentActivity中的数据 if (isTwoPane) {
    NewsContentFragment newsContentFragment = (NewsContentFragment) getFragmentManager().findFragmentById(R.id.news_content_fragment); newsContentFragment.refresh(news.getTitle(), news.getContent()); } else {
    //如果是单页模式,则直接启动NewsContentActivity NewsContentActivity.actionStart(getActivity(), news.getTitle(), news.getContent()); } } }); return holder; } @Override public void onBindViewHolder(ViewHolder holder, int position) {
    News news = mNewsList.get(position); holder.newsTitleText.setText(news.getTitle()); } @Override public int getItemCount() {
    return mNewsList.size(); } }
需要注意的是,这里把适配器写成内部类是为了直接访问 NewsTitleFragment 的变量
比如:isTowPane
现在还剩最后一步收尾工作,就是向 RecyclerView 中填充数据了
修改 NewsTitleFragment 中的代码,如下所示:
public class NewsTitleFragment extends Fragment{
    . . . @Override public View onCreateView(LayoutInflater inflater, ViewGroup container, Bundle savedInstanceState) {
    View view = inflater.inflate(R.layout.news_title_frag, container, false); //RecyclerView实例 RecyclerView newsTitleRecyclerView = (RecyclerView) view.findViewById(R.id.news_title_recycler_view); LinearLayoutManager layoutManager = new LinearLayoutManager(getActivity()); newsTitleRecyclerView.setLayoutManager(layoutManager);//指定布局为线性布局 NewsAdapter adapter = new NewsAdapter(getNews());//把模拟新闻数据传入到NewsAdapter构造函数中 newsTitleRecyclerView.setAdapter(adapter);//完成适配器设置 return view; } @Override public void onActivityCreated(Bundle savedInstanceState) {
    super.onActivityCreated(savedInstanceState); if (getActivity().findViewById(R.id.news_content_layout) != null) {
    // 可以找到news_content_layout布局时,为双页模式 isTwoPane = true; } else {
    // 找不到news_content_layout布局时,为单页模式 isTwoPane = false; } } / * 初始化50条模拟新闻数据 * @return */ private List<News> getNews() {
    //创建集合 List<News> newsList = new ArrayList<>(); //实例化数据 for (int i = 1; i <= 50; i++) {
    News news = new News(); news.setTitle("标题" + i); news.setContent(getRandomLengthContent("东营职业学院电子信息与传媒学院" + i + ". ")); newsList.add(news); } return newsList; } / * 随机生成不同长度的新闻内容 * @param content * @return */ private String getRandomLengthContent(String content) {
    Random random = new Random(); int length = random.nextInt(20) + 1; StringBuilder builder = new StringBuilder(); for (int i = 0; i < length; i++) {
builder.append(content); } return builder.toString(); } . . . } <?xml version="1.0" encoding="utf-8"?> <LinearLayout xmlns:android="http://schemas.android.com/apk/res/android" android:layout_width="match_parent" android:layout_height="match_parent" android:orientation="horizontal"> <fragment android:id="@+id/news_title_fragment" android:name="com.yiyajing.mypremission.fragment.NewsTitleFragment" android:layout_width="0dp" android:layout_height="match_parent" android:layout_weight="1" /> <FrameLayout android:id="@+id/news_content_layout" android:layout_width="0dp" android:layout_height="match_parent" android:layout_weight="3"> <fragment android:id="@+id/news_content_fragment" android:name="com.yiyajing.mypremission.fragment.NewsContentFragment" android:layout_width="match_parent" android:layout_height="match_parent" /> </FrameLayout> </LinearLayout> 可以看出,在双页模式下我们同时引入了两个碎片,并将新闻内容的碎片放在了一个FrameLayout布局下而这个布局的id正是news_content_layout,因此,能找到这个id就是双页模式,否则就是单页模式,双页模式情况下,系统会自动选择该布局。
到此这篇《第一行代码》 第四章:碎片的最佳实践的文章就介绍到这了,更多相关内容请继续浏览下面的相关推荐文章,希望大家都能在编程的领域有一番成就!版权声明:
本文来自互联网用户投稿,该文观点仅代表作者本人,不代表本站立场。本站仅提供信息存储空间服务,不拥有所有权,不承担相关法律责任。
如若内容造成侵权、违法违规、事实不符,请将相关资料发送至xkadmin@xkablog.com进行投诉反馈,一经查实,立即处理!
转载请注明出处,原文链接:https://www.xkablog.com/do-sj/10940.html
