一、ceph基础
1.1 ceph 简介
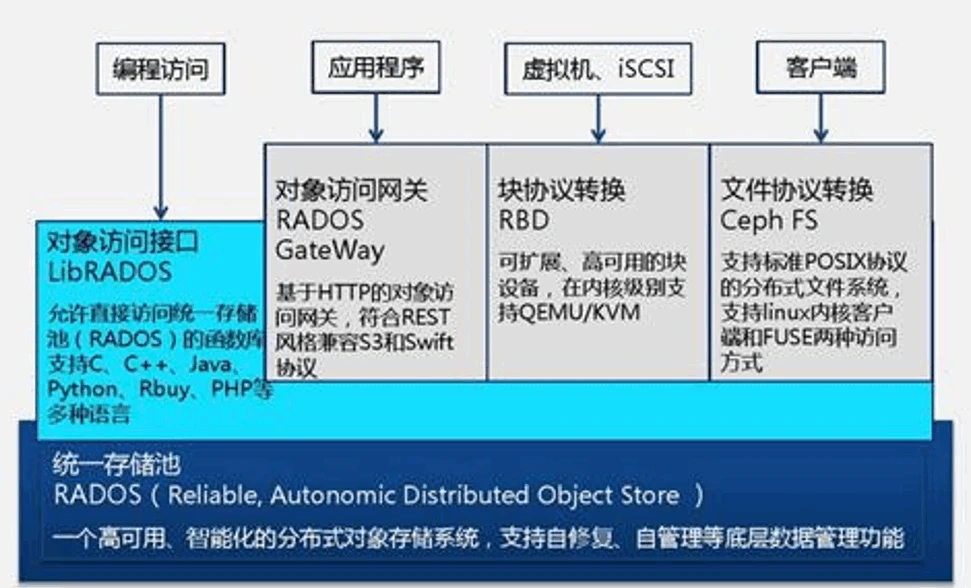
Ceph 是一个开源的分布式存储系统,同时支持对象存储、块设备、文件系统.
ceph 是一个对象(object)式存储系统,它把每一个待管理的数据流(文件等数据)切分为一到多个固定大小(默认 4 兆)的对象数据,并以其为原子单元(原子是构成元素的最小单元)完成数据的读写。
对象数据的底层存储服务是由多个存储主机(host)组成的存储集群,该集群也被称之为RADOS(reliable automatic distributed object store)存储集群,即可靠的、自动化的、分布式的对象存储系统。
librados 是 RADOS 存储集群的 API,支持 C/C++/JAVA/python/ruby/php/go等编程语言客户端。
1.2 ceph 设计思想
Ceph 的设计旨在实现以下目标: 每一组件皆可扩展
无单点故障
基于软件(而非专用设备)并且开源(无供应商锁定) 在现有的廉价硬件上运行
尽可能自动管理,减少用户干预
1.3 ceph 集群角色定义
https://docs.ceph.com/en/latest/start/intro/
http://docs.ceph.org.cn/start/intro/
一个 ceph 集群的组成部分:
若干的 Ceph OSD(对象存储守护程序)
至少需要一个 Ceph Monitors 监视器(1,3,5,7...)
两个或以上的 Ceph 管理器 managers,运行 Ceph 文件系统客户端时还需要高可用的 Ceph Metadata Server(文件系统元数据服务器)。
RADOS cluster:由多台 host 存储服务器组成的 ceph 集群
OSD(Object Storage Daemon):每台存储服务器的磁盘组成的存储空间
Mon(Monitor):ceph 的监视器,维护 OSD 和 PG 的集群状态,一个 ceph 集群至少要有一个
mon,可以是一三五七等等这样的奇数个。
Mgr(Manager):负责跟踪运行时指标和 Ceph 集群的当前状态,包括存储利用率,当前性能指标和系统负载等。
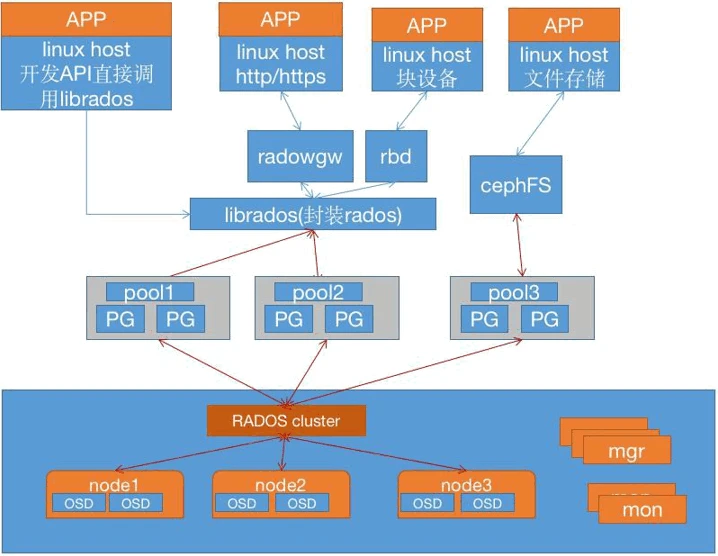
在一个主机上运行的一个守护进程,Ceph Manager 守护程序(ceph-mgr)负责跟踪运行时指标和 Ceph 集群的当前状态,包括存储利用率,当前性能指标和系统负载。Ceph
Manager 守护程序还托管基于 python 的模块来管理和公开 Ceph 集群信息,包括基于 Web
的 Ceph 仪表板和 REST API。高可用性通常至少需要两个管理器。
提供存储数据,操作系统上的一个磁盘就是一个 OSD 守护程序,OSD 用于处理 ceph 集群数据复制,恢复,重新平衡,并通过检查其他 Ceph OSD 守护程序的心跳来向 Ceph 监视器和管理器提供一些监视信息。通常至少需要 3 个 Ceph OSD 才能实现冗余和高可用性。
代表 ceph 文件系统(NFS/CIFS)存储元数据,(即 Ceph 块设备和 Ceph 对象存储不使用
MDS)
1. ceph 的常用管理接口是一组命令行工具程序,例如 rados、ceph、rbd 等命令,ceph 管理员可以从某个特定的 ceph-mon 节点执行管理操作
2. 推荐使用部署专用的管理节点对 ceph 进行配置管理、升级与后期维护,方便后期权限管理,管理节点的权限只对管理人员开放,可以避免一些不必要的误操作的发生。
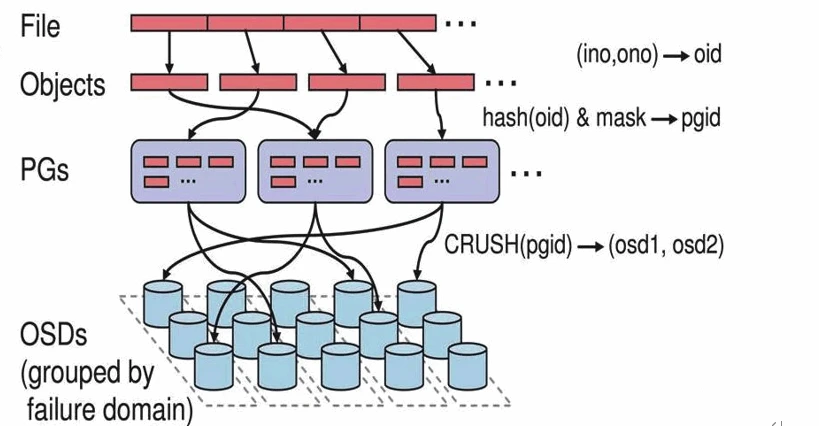
第一步: 计算文件到对象的映射
计算文件到对象的映射,假如 file 为客户端要读写的文件,得到 oid(object id) = ino + ono ino:inode number (INO),File 的元数据序列号,File 的唯一 id。
ono:object number (ONO),File 切分产生的某个 object 的序号,默认以 4M 切分一个块大小。
第二步:通过 hash 算法计算出文件对应的 pool 中的 PG:第一步: 计算文件到对象的映射:
通过一致性 HASH 计算 Object 到 PG, Object -> PG 映射 hash(oid) & mask-> pgid
第三步: 通过 CRUSH 把对象映射到 PG 中的 OSD
通过 CRUSH 算法计算 PG 到 OSD,PG -> OSD 映射:[CRUSH(pgid)->(osd1,osd2,osd3)]
第四步:PG 中的主 OSD 将对象写入到硬盘
第五步: 主 OSD 将数据同步给备份 OSD,并等待备份 OSD 返回确认第六步: 主 OSD 将写入完成返回给客户端
二 、ceph集群部署
2.1 服务器准备
集群部署至少三台服务器,本次规划如下:
cat /etc/hosts
192.168.21.150 deploy.example.local deploy
192.168.21.151 node1.example.local node1
192.168.21.152 node2.example.local node2
192.168.21.153 node3.example.local node3
192.168.21.154 mon1.example.local mon1
192.168.21.155 mon2.example.local mon2
192.168.21.156 mon3.example.local mon3
192.168.21.157 mgr.example.local mgr
cluster 网络网段为192.168.81.0/24 ,主机位与public网络相同。其中node节点上均增加3块20G磁盘
2.2 系统准备
均安装Ubuntu 18.04 ,时间同步,关闭防火墙 配置hosts 域名解析
2.3 配置清华大学镜像源
root@deploy:~# cat /etc/apt/sources.list
deb https://mirrors.tuna.tsinghua.edu.cn/ubuntu/ bionic main restricted universe multiverse
# deb-src https://mirrors.tuna.tsinghua.edu.cn/ubuntu/ bionic main restricted universe multiverse
deb https://mirrors.tuna.tsinghua.edu.cn/ubuntu/ bionic-updates main restricted universe multiverse
# deb-src https://mirrors.tuna.tsinghua.edu.cn/ubuntu/ bionic-updates main restricted universe multiverse
deb https://mirrors.tuna.tsinghua.edu.cn/ubuntu/ bionic-backports main restricted universe multiverse
# deb-src https://mirrors.tuna.tsinghua.edu.cn/ubuntu/ bionic-backports main restricted universe multiverse
deb https://mirrors.tuna.tsinghua.edu.cn/ubuntu/ bionic-security main restricted universe multiverse
# deb-src https://mirrors.tuna.tsinghua.edu.cn/ubuntu/ bionic-security main restricted universe multiverse
deb https://mirrors.tuna.tsinghua.edu.cn/ceph/debian-pacific/ bionic main
# deb-src https://mirrors.tuna.tsinghua.edu.cn/ceph/debian-pacific/ bionic main
root@deploy:~#
2.4 创建用户
groupadd -r -g 2023 magedu && useradd -r -m -s /bin/bash -u 2023 -g 2023 magedu && echo magedu: | chpasswd
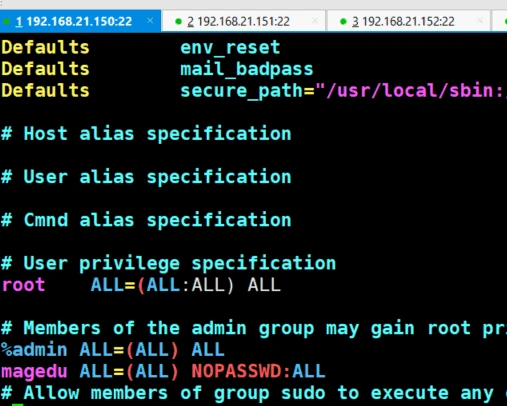
各服务器允许magedu 用户以sudo用户执行特权命令
echo "magedu ALL=(ALL) NOPASSWD: ALL" >>/etc/sudoers
配置deploy节点免密钥登录 其他各节点
切换到magedu 用户 执行ssh-keygen
ssh-copy-id magedu@192.168.21.151
ssh-copy-id magedu@192.168.21.152
ssh-copy-id magedu@192.168.21.153
ssh-copy-id magedu@192.168.21.154
ssh-copy-id magedu@192.168.21.155
ssh-copy-id magedu@192.168.21.156
ssh-copy-id magedu@192.168.21.157
2.5 安装部署工具
在deploy 节点安装ceph-deploy

2.6 初始化mon节点
创建ceph-cluster目录,保存集群初始化信息
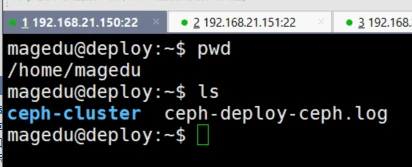
Ubuntu 各服务器需要单独安装 Python2:

建立集群并验证
magedu@deploy:~/ceph-cluster$ ceph-deploy new --cluster-network 192.168.81.0/24 --public-network 192.168.21.0/24 mon1.example.local
[ceph_deploy.conf][DEBUG ] found configuration file at: /home/magedu/.cephdeploy.conf
[ceph_deploy.cli][INFO ] Invoked (2.0.1): /usr/bin/ceph-deploy new --cluster-network 192.168.81.0/24 --public-network 192.168.21.0/24 mon1.example.local
[ceph_deploy.cli][INFO ] ceph-deploy options:
[ceph_deploy.cli][INFO ] username : None
[ceph_deploy.cli][INFO ] verbose : False
[ceph_deploy.cli][INFO ] overwrite_conf : False
[ceph_deploy.cli][INFO ] quiet : False
[ceph_deploy.cli][INFO ] cd_conf : <ceph_deploy.conf.cephdeploy.Conf instance at 0x7fd8d148edc0>
[ceph_deploy.cli][INFO ] cluster : ceph
[ceph_deploy.cli][INFO ] ssh_copykey : True
[ceph_deploy.cli][INFO ] mon : ['mon1.example.local']
[ceph_deploy.cli][INFO ] func : <function new at 0x7fd8ce745ad0>
[ceph_deploy.cli][INFO ] public_network : 192.168.21.0/24
[ceph_deploy.cli][INFO ] ceph_conf : None
[ceph_deploy.cli][INFO ] cluster_network : 192.168.81.0/24
[ceph_deploy.cli][INFO ] default_release : False
[ceph_deploy.cli][INFO ] fsid : None
[ceph_deploy.new][DEBUG ] Creating new cluster named ceph
[ceph_deploy.new][INFO ] making sure passwordless SSH succeeds
[mon1.example.local][DEBUG ] connected to host: deploy
[mon1.example.local][INFO ] Running command: ssh -CT -o BatchMode=yes mon1.example.local
[mon1.example.local][DEBUG ] connection detected need for sudo
[mon1.example.local][DEBUG ] connected to host: mon1.example.local
[mon1.example.local][DEBUG ] detect platform information from remote host
[mon1.example.local][DEBUG ] detect machine type
[mon1.example.local][DEBUG ] find the location of an executable
[mon1.example.local][INFO ] Running command: sudo /bin/ip link show
[mon1.example.local][INFO ] Running command: sudo /bin/ip addr show
[mon1.example.local][DEBUG ] IP addresses found: [u'192.168.81.154', u'192.168.21.154']
[ceph_deploy.new][DEBUG ] Resolving host mon1.example.local
[ceph_deploy.new][DEBUG ] Monitor mon1 at 192.168.21.154
[ceph_deploy.new][DEBUG ] Monitor initial members are ['mon1']
[ceph_deploy.new][DEBUG ] Monitor addrs are [u'192.168.21.154']
[ceph_deploy.new][DEBUG ] Creating a random mon key...
[ceph_deploy.new][DEBUG ] Writing monitor keyring to ceph.mon.keyring...
[ceph_deploy.new][DEBUG ] Writing initial config to ceph.conf...
magedu@deploy:~/ceph-cluster$ ls
bak ceph.conf ceph-deploy-ceph.log ceph.mon.keyring
magedu@deploy:~/ceph-cluster$ cat ceph.conf
[global]
fsid = f8b123bf-1b48-4eda-8b2f-4aff6a69318a
public_network = 192.168.21.0/24
cluster_network = 192.168.81.0/24
mon_initial_members = mon1
mon_host = 192.168.21.154
auth_cluster_required = cephx
auth_service_required = cephx
auth_client_required = cephx
magedu@deploy:~/ceph-cluster$ cat ceph.mon.keyring
[mon.]
key = AQCAZB9hAAAA
初始化存储节点
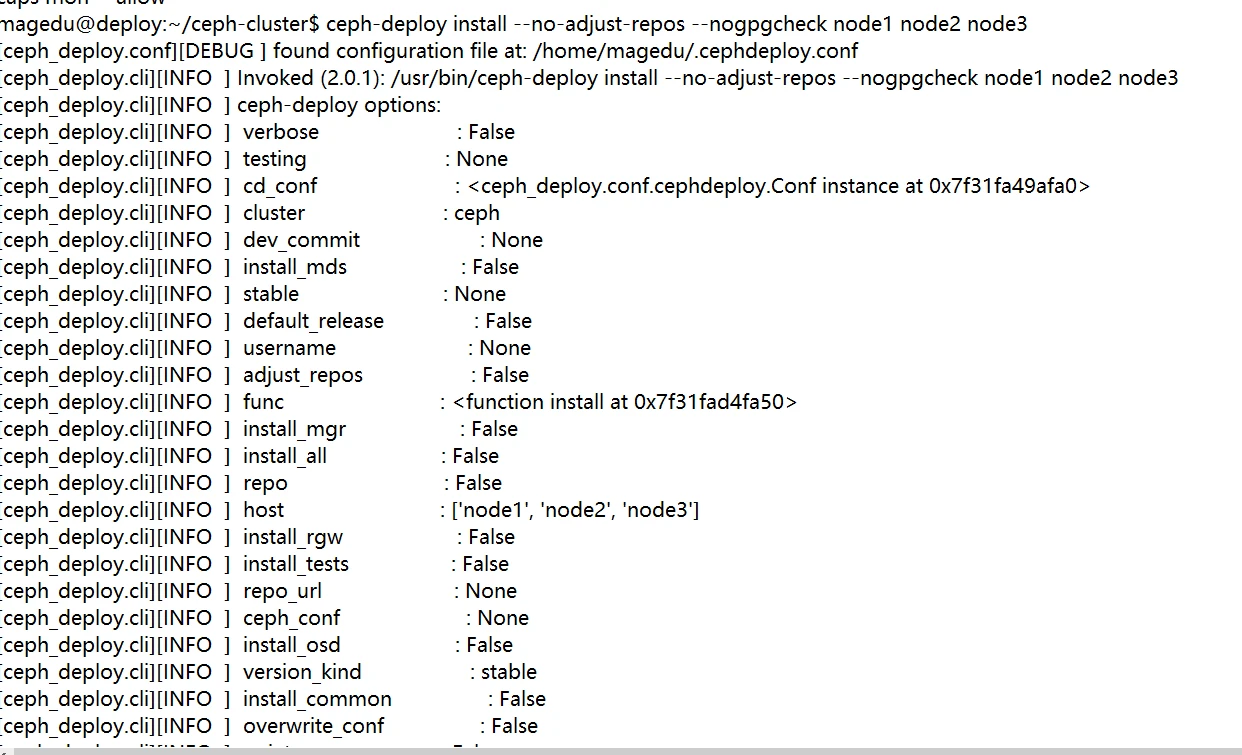
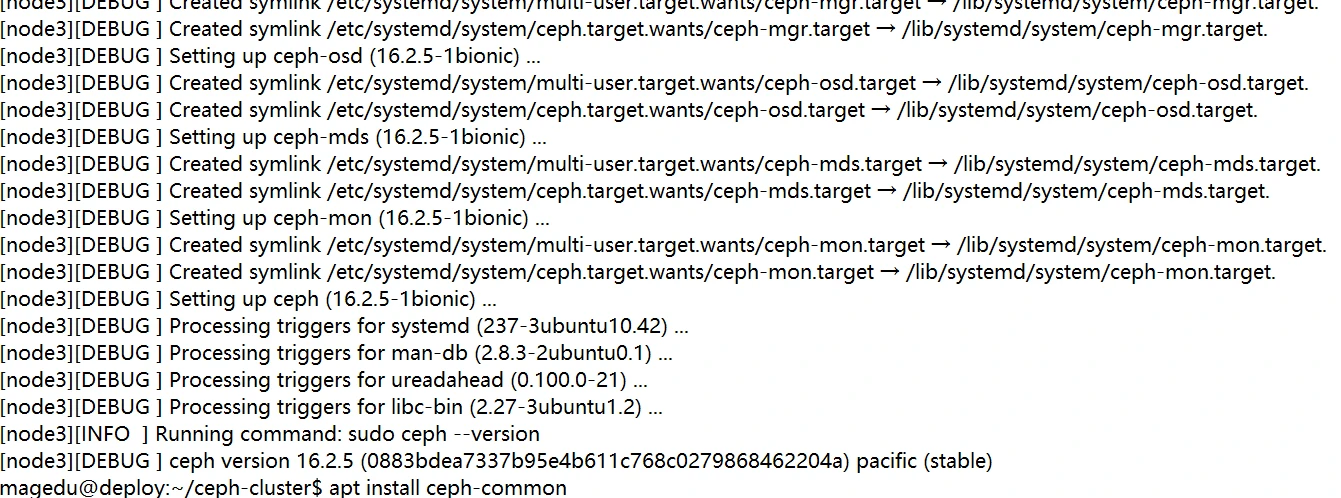
在mon节点安装mon
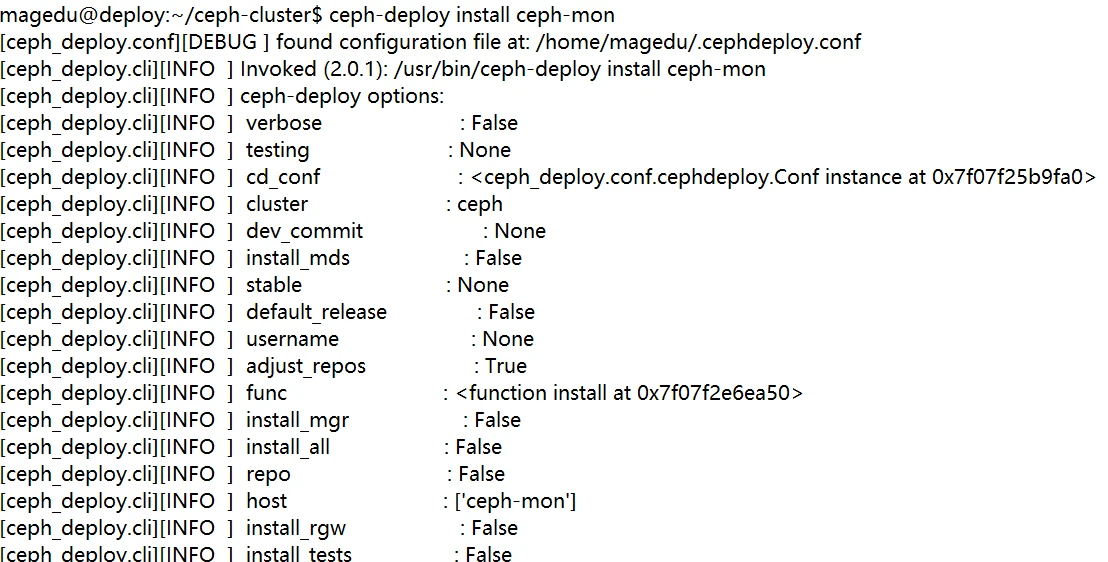
初始化mon并验证
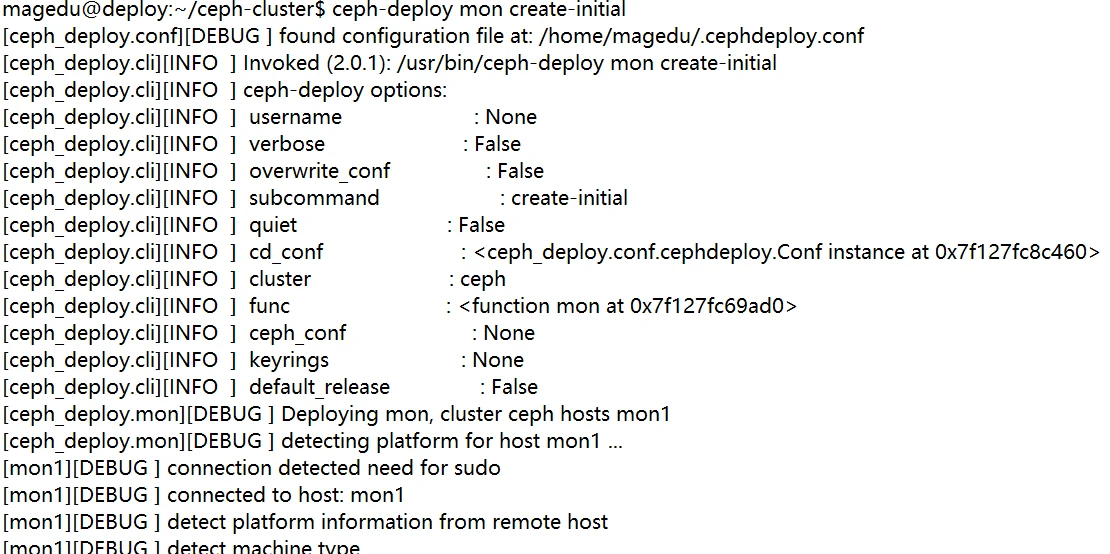


2.7 分发admin密钥
各节点安装ceph-common组件
apt install ceph-common -y
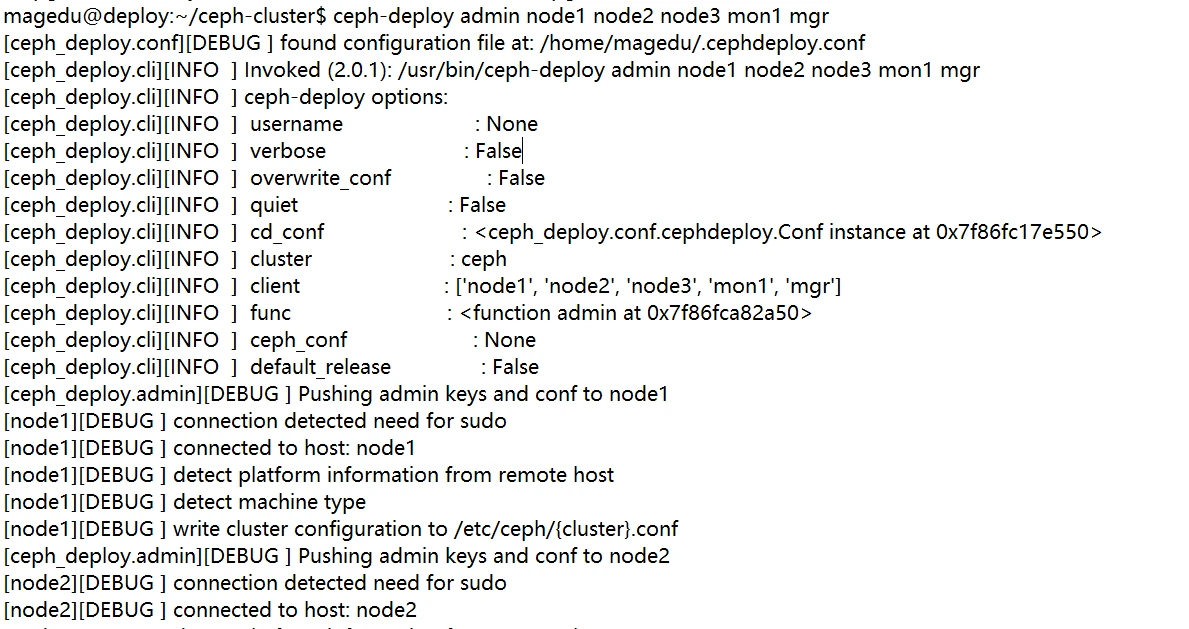
增加magedu 用户权限
setfacl -m u:magedu:rw /etc/ceph/ceph.client.admin.keyring && ll /etc/ceph

部署mgr节点
首先在mgr节点安装mgr
root@mgr:~# apt install ceph-mgr
在部署节点添加mgr
magedu@deploy:~/ceph-cluster$ ceph-deploy mgr create mgr
[ceph_deploy.conf][DEBUG ] found configuration file at: /home/magedu/.cephdeploy.conf
[ceph_deploy.cli][INFO ] Invoked (2.0.1): /usr/bin/ceph-deploy mgr create mgr
[ceph_deploy.cli][INFO ] ceph-deploy options:
[ceph_deploy.cli][INFO ] username : None
[ceph_deploy.cli][INFO ] verbose : False
[ceph_deploy.cli][INFO ] mgr : [('mgr', 'mgr')]
[ceph_deploy.cli][INFO ] overwrite_conf : False
[ceph_deploy.cli][INFO ] subcommand : create
[ceph_deploy.cli][INFO ] quiet : False
[ceph_deploy.cli][INFO ] cd_conf : <ceph_deploy.conf.cephdeploy.Conf instance at 0x7fccf3ac8f50>
[ceph_deploy.cli][INFO ] cluster : ceph
[ceph_deploy.cli][INFO ] func : <function mgr at 0x7fccf3f2b150>
[ceph_deploy.cli][INFO ] ceph_conf : None
[ceph_deploy.cli][INFO ] default_release : False
[ceph_deploy.mgr][DEBUG ] Deploying mgr, cluster ceph hosts mgr:mgr
[mgr][DEBUG ] connection detected need for sudo
Unhandled exception in thread started by
sys.excepthook is missing
lost sys.stderr
[mgr][DEBUG ] connected to host: mgr
[mgr][DEBUG ] detect platform information from remote host
[mgr][DEBUG ] detect machine type
[ceph_deploy.mgr][INFO ] Distro info: Ubuntu 18.04 bionic
[ceph_deploy.mgr][DEBUG ] remote host will use systemd
[ceph_deploy.mgr][DEBUG ] deploying mgr bootstrap to mgr
[mgr][DEBUG ] write cluster configuration to /etc/ceph/{cluster}.conf
[mgr][WARNIN] mgr keyring does not exist yet, creating one
[mgr][DEBUG ] create a keyring file
[mgr][DEBUG ] create path recursively if it doesn't exist
[mgr][INFO ] Running command: sudo ceph --cluster ceph --name client.bootstrap-mgr --keyring /var/lib/ceph/bootstrap-mgr/ceph.keyring auth get-or-create mgr.mgr mon allow profile mgr osd allow * mds allow * -o /var/lib/ceph/mgr/ceph-mgr/keyring
[mgr][INFO ] Running command: sudo systemctl enable ceph-mgr@mgr
[mgr][INFO ] Running command: sudo systemctl start ceph-mgr@mgr
[mgr][INFO ] Running command: sudo systemctl enable ceph.target

ceph-deploy 管理ceph集群
apt install ceph-common #安装common组件
ceph-deploy admin deploy #推送密钥给自己
setfacl -m:u:magedu:rw /etc/ceph/ceph.client.admin.keyring #授权
ceph -s、
、 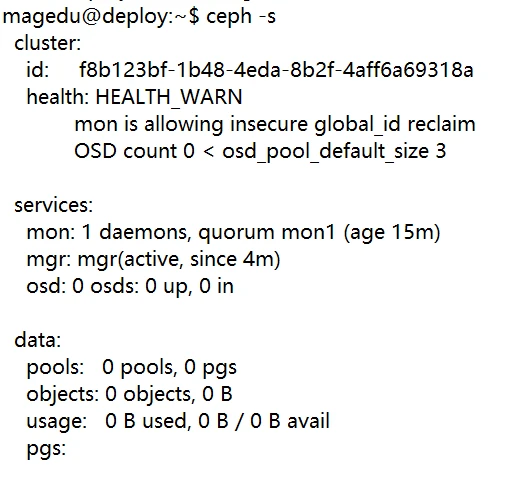
ceph config set mon auth_allow_insecure_global_id_reclaim false #消除mon告警
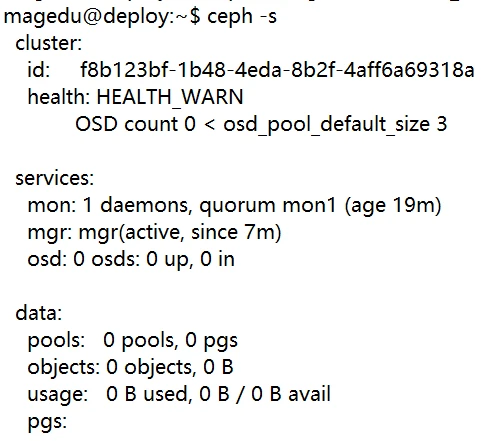
准备 OSD 节点:
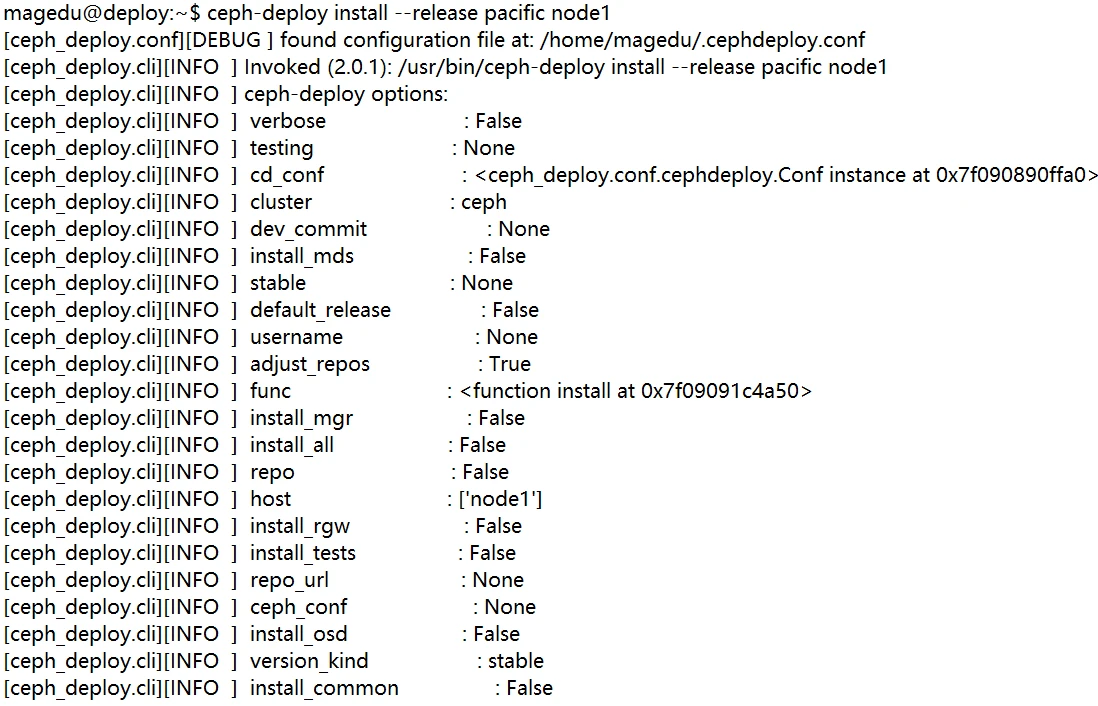
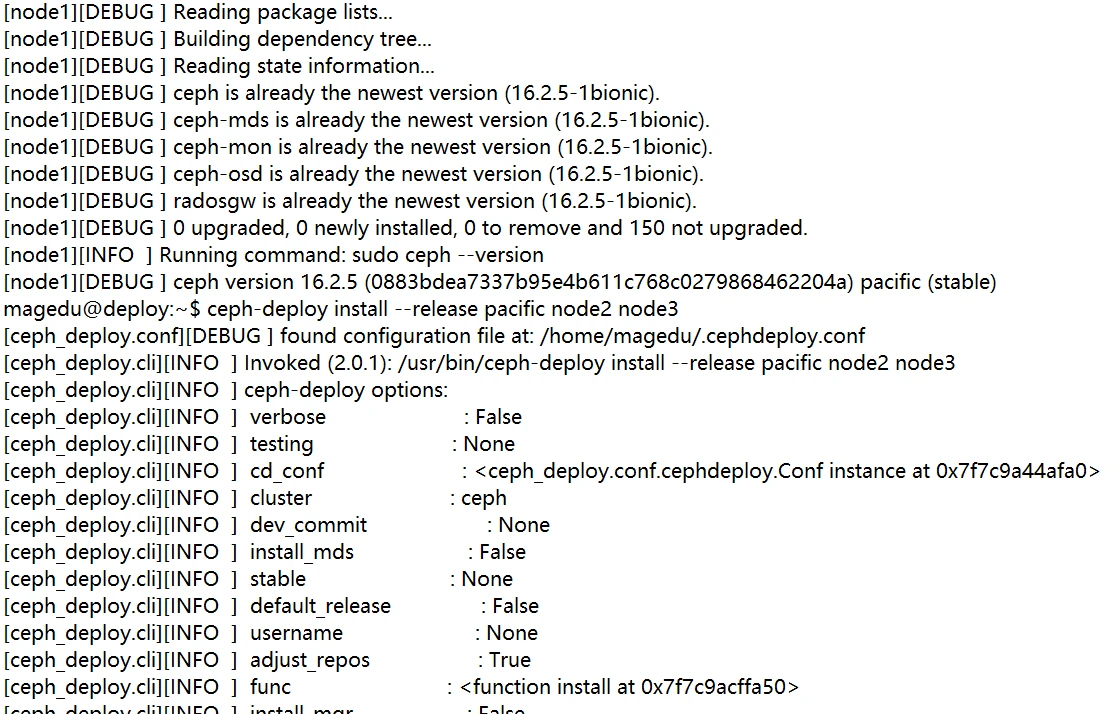
OSD 节点安装运行环境:
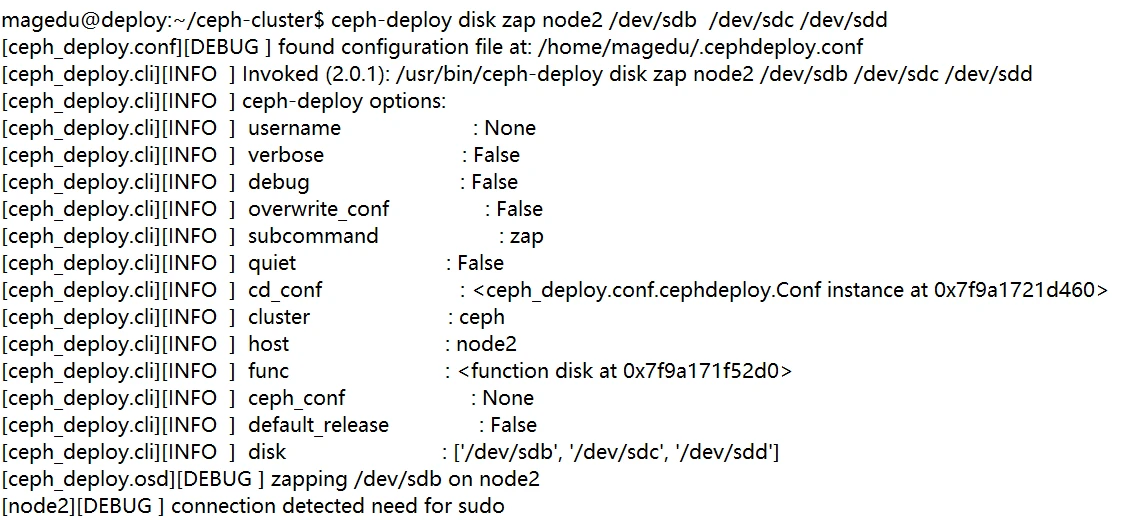
擦除各个存储节点的磁盘
创建各个存储节点数据盘

设置 OSD 服务自启动:

systemctl enable ceph-osd@0
systemctl enable ceph-osd@1
systemctl enable ceph-osd@2
依次设置其他节点
到此这篇ceph存储部署(ceph文件存储特性)的文章就介绍到这了,更多相关内容请继续浏览下面的相关推荐文章,希望大家都能在编程的领域有一番成就!
版权声明:
本文来自互联网用户投稿,该文观点仅代表作者本人,不代表本站立场。本站仅提供信息存储空间服务,不拥有所有权,不承担相关法律责任。
如若内容造成侵权、违法违规、事实不符,请将相关资料发送至xkadmin@xkablog.com进行投诉反馈,一经查实,立即处理!
转载请注明出处,原文链接:https://www.xkablog.com/hd-yjs/60582.html
