插槽可以实现将标签或其他文本插入到子组件中。
主要有以下四种插槽:
1,默认插槽:子组件预设位置 2,具名插槽:子组件预留指定位置 3,作用域插槽:选择性地将子组件某些属性的作用域扩展给父组件使用。 4,动态插槽:即插槽名字是变量。 一,默认插槽
//子组件 <div class="child-box"> <div class="header">普通插槽</div> <div class="content"> <slot>当父组件不使用时默认的插槽内容</slot> </div> </div> //父组件 <Children> <span>父组件使用插槽之后</span> </Children> 实现的效果:

1,插槽的作用域
值得注意的是,父组件中提供的插槽内容是写在父组件中的。所以他的作用域是父组件。插槽内容的css样式可以直接写在父组件中而不用:deep()来样式穿透。数据也是直接使用父组件的而不需要组件传值。
也是就是说: 任何父组件模板中的东西都只被编译到父组件的作用域中;而任何子组件模板中的东西都只被编译到子组件的作用域中。
2,插槽的默认值
可以为插槽定义默认内容,就和给props定义默认值一样,如果在父组件中没有传入,则使用默认内容。反之如果父组件有传入内容,则使用父组件传入的内容。
二,具名插槽
有的时候,子组件需要在多个位置使用插槽,若只使用默认插槽,父组件的插槽内容会默认插入到所有的slot上。而无法达到我们想要的不同插槽位置显示不同内容的效果。

为了达到父组件的插槽能够插入子组件的指定位置。就给每个子组件的插槽命好各自的名字(name=slotName)。于是父组件在使用时,就可以通过v-slot:slotName的方式精准地找到自己地插槽了。
1,写法规范化
对于插槽。父组件在使用时需要使用template包裹。
2,具名插槽的写法
子组件:name="slotName"
父组件:v-slot:slotName
父组件简写:#slotName
默认组件没有名字,于是它的名字就是:default
//子组件 <template> <div class="child-box"> <div class="header">普通插槽</div> <div class="content"> <slot>当父组件不使用时默认的插槽内容</slot> </div> <div class="footer"> <slot name="footerContent">当父组件不使用时默认的插槽内容</slot> </div> <div class="bottom"> <slot name="bottomContent">当父组件不使用时默认的插槽内容</slot> </div> </div> </template> //父组件 <Children> <template #default> <span>放置在content默认插槽</span> </template> <template v-slot:footerContent> <span>放置在footer的具名插槽:完整写法</span> </template> <template #bottomContent> <span>放置在bottom的具名插槽:缩略写法</span> </template> </Children> 
三,作用域插槽
1,作用域插槽的使用
实际上就是将子组件的属性传递给父组件使用。也就是让插槽内容能够访问子组件中才有的数据。
我们组件间传递数据,用的就是属性绑定。
于是可以根据自己的需要将任意数量的 attribute 绑定到 slot 上:
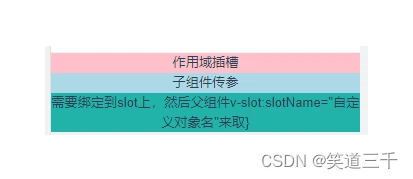
//子组件将参数绑定到slot上 <template> <div class="child-box"> <div class="header">作用域插槽</div> <div class="content"> <slot :test="renderObj.test"></slot> </div> <div class="footer"> <slot name="footerContent" :content="renderObj.content"></slot> </div> </div> </template> <script setup> const renderObj = {
    test: '子组件传参', content: '需要绑定到slot上,然后父组件v-slot:slotName="自定义对象名"来取' }; </script>
注意到上文,我在slot上属性绑定了子组件的属性,子组件会将所有绑定在该slot上的属性集合到一个对象中抛给父组件。
父组件为了能够准确地取到对应子组件的传参。需要直接使用具名插槽中命名的插槽名字。然后自定义一个名字来接收子组件抛出来的对象:
 <Children> <template #default="slotObj"> <span>{
  { slotObj.test }}</span> </template> <template #footerContent="slotProps"> <span>{
  { slotProps.content }}}</span> </template> </Children>
实现的效果:

2,作用域插槽的解构赋值
从1中可以知道,子组件将任意数量的属性绑定到插槽上。抛出一个对象给父组件使用。也就是说,在父组件接收的时候,就可以使用es6的解构赋值和取别名的方式接收。
 <Children> <template #default="{ test }"> <span>{
  { test }}</span> </template> <template #footerContent="{ content: anotherName }"> <span>{
  { anotherName }}}</span> </template> </Children>
这里就是把test解构出来使用,以及将content解构出来起别名为anotherName来使用。
四,动态插槽
实际上,就是子组件的插槽名字采用父组件传入的值来确定,也就是变量。
1,简单的动态插槽
子组件:
<template> <div class="table-box"> <div class="content-box"> <slot :name="item" v-for="(item, index) in list" :key="index"></slot> </div> </div> </template> <script setup> import {
    computed } from 'vue'; let props = defineProps({
    list: {
    type: Array, require: true, default: () => [] } }); </script>
于是就能创建出一系列的插槽:
//父组件 <Table :list="list"> <template #first> <span>第一个具名插槽</span> </template> <template #second> <span>第二个具名插槽</span> </template> <template #third> <span>第三个具名插槽</span> </template> </Table> const list = ['first', 'second', 'third']; 网上好多文章说这个动态插槽很少用,了解就行。但是我感觉这个动态插槽在某些场合功能强大。
2,动态插槽在二次封装组件中的应用
举个例子:对于el-table组件的二次封装时,就可以使用:
<template> <div class="w template-table-container"> <el-table :data="tableData" border > <el-table-column v-for="(item, index) in columns" :key="index" :prop="item.propName" :label="item.label" :width="item.width || ''" > <template v-slot="{ row, column }"> <slot v-if="item.slotName" :name="item.slotName" v-bind:row="row" ></slot> <div v-else> {
  { item.formatter ? item.formatter({ row, column }) : row[item.propName] }} </div> </template> </el-table-column> </el-table> </div> </template> <script> / * @param tableData 表格数据 * @param columns 表格列配置数组 * columns内容项接口 { * propName: string; * label: string; * width?: string; * slotName?: string; * formatter?: ({row, column}) => string; * } */ export default { props: { tableData: { type: Array, required: true, default: () => [] }, columns: { type: Array, required: true, default: () => [] } } } </script>
父组件中使用:
<TemplateTable class="table-box" :tableData="tableData" :columns="columns" > <template #img="{ row }"> <el-image class="img" :src="row.url" :preview-src-list="[row.url]" > </el-image> </template> <template #operation="{ row }"> <el-button type="warning" size="small" round icon="el-icon-edit" @click="handleEdit(row)" >编辑</el-button > <el-button type="danger" size="small" round icon="el-icon-delete" @click="handleDelete(row)" >删除</el-button > </template> </TemplateTable> 然后tableData是正常使用的el-table表格的数据,columns是用户针对表格数据配置的列信息。
import dayjs from "dayjs" export default {
    data() {
    return {
    columns: [ {
    propName: "img", label: "照片", slotName: "img", width: 200 }, {
    propName: "id", label: "编号" }, {
    propName: "name", label: "名字", width: 100 }, {
    propName: "sex", label: "性别", width: 100, slotName: "sex" }, {
    propName: "birthday", label: "生日", width: 100, formatter: this.formatBirthday }, {
    propName: "size", label: "体型", width: 100, formatter: this.formatSize }, {
    propName: "", label: "操作", width: "300", slotName: "operation" } ] } }, methods: {
    formatSize({
     row }) {
    switch (row.size) {
    case 1: return "小型" case 2: return "中型" default: return "大型" } }, formatBirthday({
     row }) {
    return dayjs(row.birthday).format("YYYY-MM-DD") } } }
于是就可以通过tableData和columns两个列表来驱动表格的渲染,而不用在页面写一大堆的el-table-column标签。
五,动态组件
动态组件就是在一个多标签的界面中使用 is attribute 来切换不同的组件:
<component v-bind:is="currentTabComponent"></component> 实际例子:
<template> <div class="campus-main-content"> <div class="tab-box"> <div :class="[ 'tab-btn', currentTabComponent === item.value ? 'btn-active' : '' ]" v-for="(item, index) in renderArr" :key="index" @click="chooseType(item.value)" > {
  { item.content }} </div> </div> <component v-bind:is="currentTabComponent"></component> </div> </template> <script> import DataUV from './componcents/DataUV.vue'; import ChartUV from './componcents/ChartUV.vue'; export default { name: 'campus-data', components: { DataUV, ChartUV }, data() { return { currentTabComponent: 'DataUV', renderArr: [ { value: 'DataUV', content: '数据报表' }, { value: 'ChartUV', content: '统计报表' } ] }; }, methods: { chooseType(val) { this.currentTabComponent = val; } } }; </script> <style lang="scss" scoped> .campus-main-content { width: 100%; .tab-box { display: flex; justify-content: flex-start; margin: 20px; height: 40px; width: 200px; background: #d1eafc; border-radius: 10px; overflow: hidden; .tab-btn { text-align: center; height: 40px; width: 100px; background: transparent; line-height: 40px; cursor: pointer; } .btn-active { background: #409eff; color: #ffffff; } } } </style>
而有时,我们更希望那些标签的组件实例能够被在它们第一次被创建的时候缓存下来。为了解决这个问题,我们可以用一个 <keep-alive> 元素将其动态组件包裹起来。
<!-- 失活的组件将会被缓存!--> <keep-alive> <component v-bind:is="currentTabComponent"></component> </keep-alive> 版权声明:
本文来自互联网用户投稿,该文观点仅代表作者本人,不代表本站立场。本站仅提供信息存储空间服务,不拥有所有权,不承担相关法律责任。
如若内容造成侵权、违法违规、事实不符,请将相关资料发送至xkadmin@xkablog.com进行投诉反馈,一经查实,立即处理!
转载请注明出处,原文链接:https://www.xkablog.com/hdkf/10997.html
