
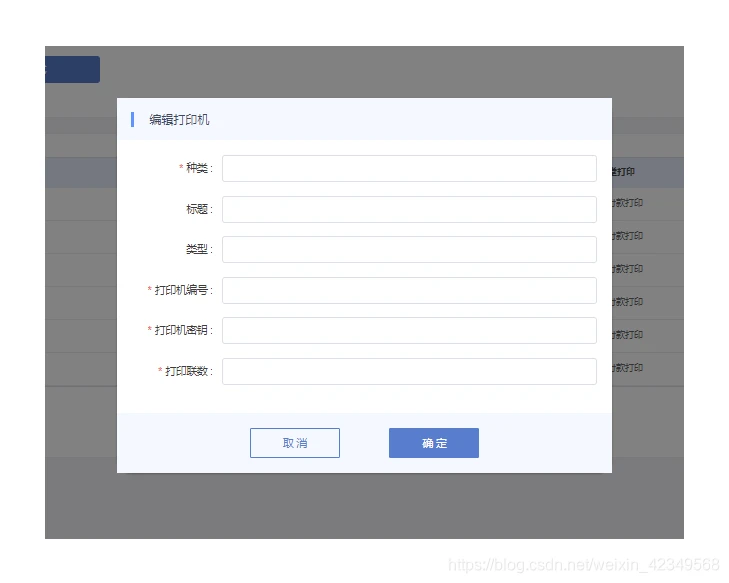
一,使用效果
多个页面要使用这样的弹窗效果,所以需要封装一个dialog
二,实现代码
1,初步封装
<template> <div class="comDialog"> <!-- 编辑/新增 弹框 --> <el-dialog :visible.sync="visible" :width="width" :close-on-click-modal="closeOnClickModal" :show-close="false"> <div slot="title" class="dialog-title"> {
   {
   title}} </div> <div> <slot></slot> </div> <div slot="footer"> <div class="tan_dialog"> <slot name="leftButton"></slot> <el-button @click="cancel" type="info" class="tan_cal">取 消</el-button> <el-button type="primary" @click="visibleSure" class="tan_sure">{
   {
   sureBtn}}</el-button> </div> </div> </el-dialog> </div> </template> <script> export default {
    props: {
    title: String, value: {
    type: Boolean, default: false }, width:{
    type: String, default: '660' }, closeOnClickModal:{
    type:Boolean, default:true }, sureBtn:{
    type: String, default: '确 定' }, }, data() {
    return {
    visible: this.value }; }, mounted() {
    }, watch: {
    value() {
    this.visible = this.value; }, visible: {
    handler(newName) {
    this.$emit("input", newName); }, deep: true } }, methods: {
    visibleSure() {
    this.$emit("confirm"); }, cancel(){
    this.$emit('cancel'); setTimeout(()=>{
    this.visible=false },0) } } }; </script> <style scoped> </style>
2,对应不同业务的再处理
<template> <div> <!-- 添加 / 编辑 类目弹框 --> <com-dialog :title="title" v-model="dialogVisible" @confirm="confirm"> <div class="form_dialog"> <el-form ref="dialogVisiForm" label-width="120px" :rules="rules" :model="Form"> <el-form-item label="种类 :" prop="category"> <el-input v-model="Form.category"></el-input> </el-form-item> <el-form-item label="标题 :" prop="title"> <el-input v-model.number="Form.title" ></el-input> </el-form-item> <el-form-item label="类型 :" prop="type"> <el-input v-model="Form.type"></el-input> </el-form-item> <el-form-item label="打印机编号 :" prop="number"> <el-input v-model.number="Form.number"></el-input> </el-form-item> <el-form-item label="打印机密钥 :" prop="password"> <el-input v-model.number="Form.password"></el-input> </el-form-item> <el-form-item label="打印联数 :" prop="amount"> <el-input v-model.number="Form.amount"></el-input> </el-form-item> </el-form> </div> </com-dialog> </div> </template> <script> import comDialog from "@/components/comDialog"; export default {
    components: {
    comDialog }, props: {
    value: {
    type: Boolean, default: false }, title: {
    type: String, default: "" }, propsFrom:{
    default: {
    category: "", title: '', type: "", number: "", password: "", amount: "" } } }, data() {
    return {
    dialogVisible: this.value, Form: this.propsFrom, rules: {
    category: [{
    required: true, message: "请输入种类", trigger: "blur" }], number: [{
    required: true, message: "请输入打印机编号", trigger: "blur" }], password: [{
    required: true, message: "请输入打印机编号", trigger: "blur" }], amount: [{
    required: true, message: "请输入打印机编号", trigger: "blur" }] } }; }, methods: {
    confirm(){
    this.$refs['dialogVisiForm'].validate((valid) => {
    if (valid) {
    this.$emit("getConfirm", this.Form); } else {
    console.log('error submit!!'); return false; } }); } }, watch: {
    propsFrom(val){
    this.Form=val }, value() {
    this.dialogVisible = this.value; }, dialogVisible: {
    handler(newName) {
    this.$emit("input", newName); }, deep: true } } }; </script> <style scoped lang="less"> .line{
    .spanLine{
    display: block; text-align: center; color: #; } } </style>
3,具体项目页面的使用
import dialogComponent from "./dialogComponent.vue"; export default {
    components: {
    dialogComponent },
和
<!-- 编辑对话框 --> <dialog-component title="编辑打印机" v-model="dialogVisible" @getConfirm="getConfirm" :propsFrom="form" ref="formRef"> </dialog-component> 版权声明:
本文来自互联网用户投稿,该文观点仅代表作者本人,不代表本站立场。本站仅提供信息存储空间服务,不拥有所有权,不承担相关法律责任。
如若内容造成侵权、违法违规、事实不符,请将相关资料发送至xkadmin@xkablog.com进行投诉反馈,一经查实,立即处理!
转载请注明出处,原文链接:https://www.xkablog.com/hdkf/11093.html