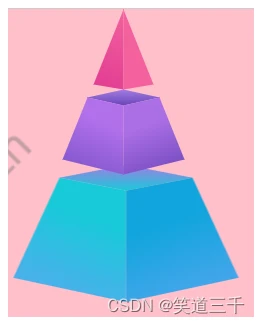
一,效果

二,代码
<template> <div id="app"> <!-- 1、创建 canvas 元素 --> <canvas width="500" height="500" id="canvas" style="border: 1px solid #ccc" ></canvas> </div> </template> <script> //引入fabric import {
    fabric } from "fabric"; export default {
    name: "App", components: {
   }, mounted() {
    //新建画布对象 const canvas = new fabric.Canvas("canvas", {
    backgroundColor: "pink", }); // 多边形 const polygon1 = new fabric.Polygon( [ {
    x: 30, y: 0, }, {
    x: 30, y: 80, }, {
    x: 0, y: 75, }, ], {
    top: 20, left: 220, fill: "red", } ); const gradient1 = new fabric.Gradient({
    type: "linear", //线性渐变,可取值:linear or radial gradientUnits: "pixels", //默认为像素,但可以指定为百分比:pixels or pencentage coords: {
    x1: 0, y1: 75, x2: 30, y2: 0 }, //线性渐变的起点和终点 colorStops: [ {
    offset: 0, color: "#e23c92" }, {
    offset: 1, color: "#f4609e" }, ], //线性渐变的颜色分层,offset:0是起点,1是终点,中间可以多层 }); polygon1.set("fill", gradient1); // 多边形 const polygon2 = new fabric.Polygon( [ {
    x: 30, y: 0, }, {
    x: 30, y: 80, }, {
    x: 60, y: 75, }, ], {
    top: 20, left: 250, fill: "red", } ); const gradient2 = new fabric.Gradient({
    type: "linear", //线性渐变,可取值:linear or radial gradientUnits: "pixels", //默认为像素,但可以指定为百分比:pixels or pencentage coords: {
    x1: 30, y1: 80, x2: 60, y2: 80 }, //线性渐变的起点和终点 colorStops: [ {
    offset: 0, color: "#f4609e" }, {
    offset: 1, color: "#f286ba" }, ], //线性渐变的颜色分层,offset:0是起点,1是终点,中间可以多层 }); polygon2.set("fill", gradient2); const group1 = new fabric.Group([polygon1, polygon2], {
    //公用的属性可以设置到这里来 left: 220, top: 0, }); // 多边形 const polygon3 = new fabric.Polygon( [ {
    x: 36, y: 0, }, {
    x: 72, y: 8, }, {
    x: 36, y: 16, }, {
    x: 0, y: 8, }, ], {
    top: 80, left: 214, fill: "red", } ); const gradient3 = new fabric.Gradient({
    type: "linear", //线性渐变,可取值:linear or radial gradientUnits: "pixels", //默认为像素,但可以指定为百分比:pixels or pencentage coords: {
    x1: 36, y1: 16, x2: 36, y2: 0 }, //线性渐变的起点和终点 colorStops: [ {
    offset: 0, color: "#6a43b8" }, {
    offset: 1, color: "#a17ce2" }, ], //线性渐变的颜色分层,offset:0是起点,1是终点,中间可以多层 }); polygon3.set("fill", gradient3); // 多边形 const polygon4 = new fabric.Polygon( [ {
    x: 0, y: 8, }, {
    x: 36, y: 16, }, {
    x: 36, y: 85, }, {
    x: -25, y: 70, }, ], {
    top: 88, left: 189, fill: "red", } ); const gradient4 = new fabric.Gradient({
    type: "linear", //线性渐变,可取值:linear or radial gradientUnits: "pixels", //默认为像素,但可以指定为百分比:pixels or pencentage coords: {
    x1: -25, y1: 70, x2: 0, y2: 8 }, //线性渐变的起点和终点 colorStops: [ {
    offset: 0, color: "#7950c6" }, {
    offset: 1, color: "#b16feb" }, ], //线性渐变的颜色分层,offset:0是起点,1是终点,中间可以多层 }); polygon4.set("fill", gradient4); // 多边形 const polygon5 = new fabric.Polygon( [ {
    x: 72, y: 8, }, {
    x: 36, y: 16, }, {
    x: 36, y: 85, }, {
    x: 97, y: 70, }, ], {
    top: 88, left: 250, fill: "red", } ); const gradient5 = new fabric.Gradient({
    type: "linear", //线性渐变,可取值:linear or radial gradientUnits: "pixels", //默认为像素,但可以指定为百分比:pixels or pencentage coords: {
    x1: 97, y1: 70, x2: 72, y2: 8 }, //线性渐变的起点和终点 colorStops: [ {
    offset: 0, color: "#6841b8" }, {
    offset: 1, color: "#aa6de4" }, ], //线性渐变的颜色分层,offset:0是起点,1是终点,中间可以多层 }); polygon5.set("fill", gradient5); const group2 = new fabric.Group([polygon3, polygon4, polygon5], {
    //公用的属性可以设置到这里来 left: 189, top: 80, }); // 多边形 const polygon6 = new fabric.Polygon( [ {
    x: 36, y: 0, }, {
    x: 72, y: 8, }, {
    x: 36, y: 16, }, {
    x: 0, y: 8, }, ], {
    top: 80, left: 214, fill: "red", } ); const gradient6 = new fabric.Gradient({
    type: "linear", //线性渐变,可取值:linear or radial gradientUnits: "pixels", //默认为像素,但可以指定为百分比:pixels or pencentage coords: {
    x1: 36, y1: 16, x2: 36, y2: 0 }, //线性渐变的起点和终点 colorStops: [ {
    offset: 0, color: "#18c9d9" }, {
    offset: 1, color: "#a17ce2" }, ], //线性渐变的颜色分层,offset:0是起点,1是终点,中间可以多层 }); polygon6.set("fill", gradient6); // 多边形 const polygon7 = new fabric.Polygon( [ {
    x: 0, y: 8, }, {
    x: 36, y: 16, }, {
    x: 36, y: 85, }, {
    x: -25, y: 70, }, ], {
    top: 88, left: 189, fill: "red", } ); const gradient7 = new fabric.Gradient({
    type: "linear", //线性渐变,可取值:linear or radial gradientUnits: "pixels", //默认为像素,但可以指定为百分比:pixels or pencentage coords: {
    x1: -25, y1: 70, x2: 0, y2: 8 }, //线性渐变的起点和终点 colorStops: [ {
    offset: 0, color: "#5ca6f2" }, {
    offset: 1, color: "#18c9d9" }, ], //线性渐变的颜色分层,offset:0是起点,1是终点,中间可以多层 }); polygon7.set("fill", gradient7); // 多边形 const polygon8 = new fabric.Polygon( [ {
    x: 72, y: 8, }, {
    x: 36, y: 16, }, {
    x: 36, y: 85, }, {
    x: 97, y: 70, }, ], {
    top: 88, left: 250, fill: "red", } ); const gradient8 = new fabric.Gradient({
    type: "linear", //线性渐变,可取值:linear or radial gradientUnits: "pixels", //默认为像素,但可以指定为百分比:pixels or pencentage coords: {
    x1: 97, y1: 70, x2: 72, y2: 8 }, //线性渐变的起点和终点 colorStops: [ {
    offset: 0, color: "#5ca6f2" }, {
    offset: 1, color: "#10a5dd" }, ], //线性渐变的颜色分层,offset:0是起点,1是终点,中间可以多层 }); polygon8.set("fill", gradient8); const group3 = new fabric.Group([polygon6, polygon7, polygon8], {
    //公用的属性可以设置到这里来 left: 189, top: 160, scale: 2, }); canvas.add(group3, group2, group1); }, data() {
    return {
   }; }, methods: {
}, }; </script> <style scoped lang="scss"></style> 版权声明:
本文来自互联网用户投稿,该文观点仅代表作者本人,不代表本站立场。本站仅提供信息存储空间服务,不拥有所有权,不承担相关法律责任。
如若内容造成侵权、违法违规、事实不符,请将相关资料发送至xkadmin@xkablog.com进行投诉反馈,一经查实,立即处理!
转载请注明出处,原文链接:https://www.xkablog.com/rfx/10952.html
