
第一章:Spring框架的介绍
1. Spring框架的概述
2. Spring框架的优点
第二章:创建Hello world
第三章:Spring IOC容器
1. 什么是IOC
2. IOC容器的底层原理
IOC的实现,依赖于以下3门技术
那么上边提到的三种技术如何实现IOC的呢?
3.IOC(接口)
第四章:Spring框架的Bean管理
(1).什么是Bean个管理
(2).Bean管理操作的两种方式
(3).基于xml配置文件的方式实现Bean管理和注入属性
1.基于xml方式创建对象
2.基于xml方式注入属性
(4).基于注解的方式实现Bean管理和注入属性
1.什么是注解
2.Spring针对Bean管理中创建对象提供的注解
3.用注解的方式创建对象
4.用注解的方实现属性注入
2. 常用的注解
3. IOC纯注解的方式
第一章:Spring框架的介绍
1. Spring框架的概述
Spring是一个开放源代码的设计层面框架,它解决的是业务逻辑层和其他各层的松耦合问题,因此它将面向接口的编程思想贯穿整个系统应用。
Spring是于2003 年兴起的一个轻量级的Java开发框架,由Rod Johnson在其著作Expert One-On-One J2EE.
Development and Design中阐述的部分理念和原型衍生而来。
它是为了解决企业应用开发的复杂性而创建的。框架的主要优势之一就是其分层架构,分层架构允许使用者选择使用哪一个组件,同时为 JavaEE 应用程序开发提供集成的框架。
Spring的核心是控制反转(IOC)和面向切面(AOP)。简单来说,Spring是一个分层的JavaSE/EEfull-stack(一站式) 轻量级开源框架。
IOC:控制反转,将创建对象的过程交给spring进行管理.
AOP:面向切面,在不修改源代码的情况之下进行代码功能的增强.
2. Spring框架的优点
方便解耦,简化开发,Spring就是一个大工厂,可以将所有对象创建和依赖关系维护,交给Spring管理,这也是IOC的作用。
AOP编程的支持,Spring提供面向切面编程,可以方便的实现对程序进行权限拦截、运行监控等功能。
声明式事务的支持,只需要通过配置就可以完成对事务的管理,而无需手动编程。
方便程序的测试,Spring对Junit4支持,可以通过注解方便的测试Spring程序。
方便集成各种优秀框架,Spring不排斥各种优秀的开源框架,其内部提供了对各种优秀框架(如:Struts2、Hibernate、MyBatis等)的直接支持。
降低JavaEE API的使用难度,Spring 对JavaEE开发中非常难用的一些API(JDBC、JavaMail等),都提供了封装,使这些API应用难度大大降低。
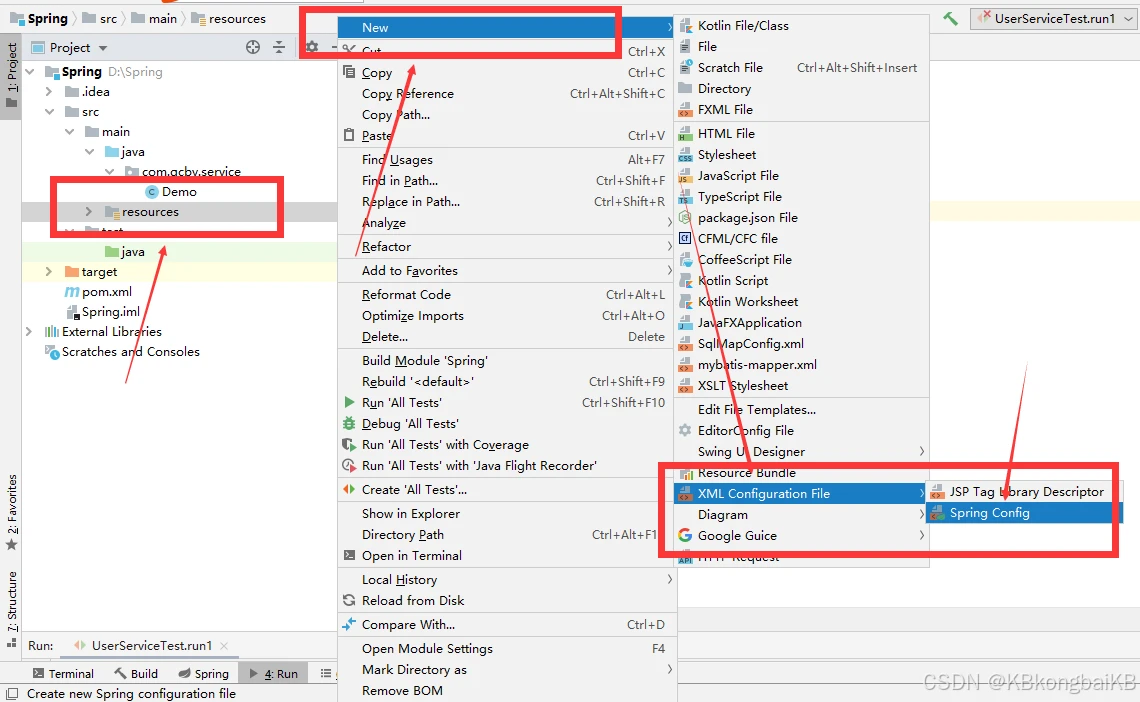
第二章:创建Hello world
创建maven工程,导入坐标依赖
<dependencies> <dependency> <groupId>org.springframework</groupId> <artifactId>spring-context</artifactId> <version>5.0.2.RELEASE</version> </dependency> <dependency> <groupId>commons-logging</groupId> <artifactId>commons-logging</artifactId> <version>1.2</version> </dependency> <dependency> <groupId>log4j</groupId> <artifactId>log4j</artifactId> <version>1.2.12</version> </dependency> <dependency> <groupId>junit</groupId> <artifactId>junit</artifactId> <version>4.12</version> <scope>test</scope> </dependency> </dependencies>
编写demo,编写具体的实现方法
package com.qcby.service; public class Demo { public void hello() { System.out.println("hello world"); } }
编写Spring核心的配置文件,在resources目录下创建applicationContext.xml的配置文件,名称是可以任意的,但是一般都会使用默认名称。
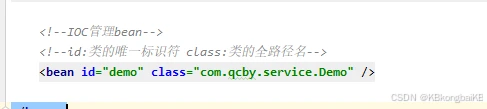
 <?xml version="1.0" encoding="UTF-8"?> <beans xmlns="http://www.springframework.org/schema/beans" xmlns:xsi="http://www.w3.org/2001/XMLSchema-instance" xsi:schemaLocation=" http://www.springframework.org/schema/beans http://www.springframework.org/schema/beans/spring-beans.xsd"> <!--IOC管理bean--> <!--id:类的唯一标识符 class:类的全路径名--> <bean id="demo" class="com.qcby.service.Demo" /> </beans>
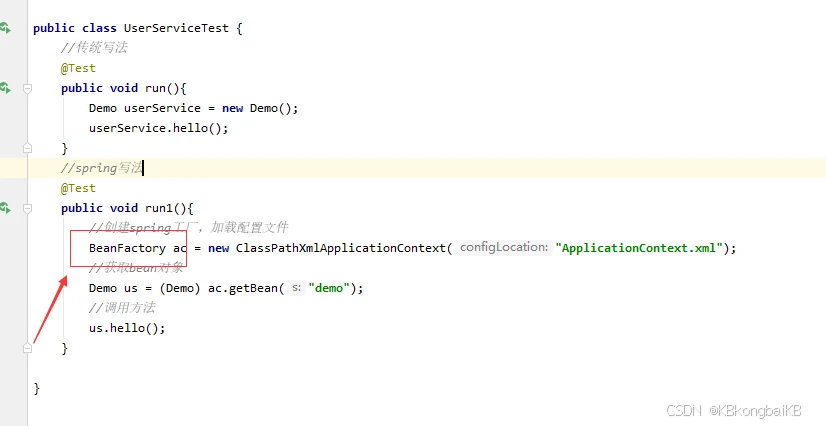
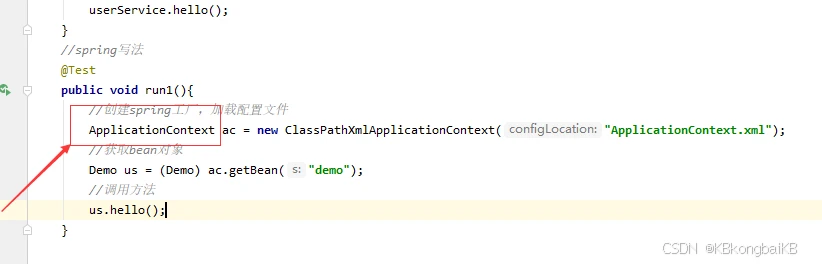
编写测试方法。
package com.qcby.servic; import com.qcby.service.UserService; import com.qcby.service.UserServiceImpl; import org.junit.Test; import org.springframework.context.ApplicationContext; import org.springframework.context.support.ClassPathXmlApplicationContext; public class UserServiceTest { //传统写法 @Test public void run(){ Demo userService = new Demo(); userService.hello(); } //spring写法 @Test public void run1(){ //创建spring工厂,加载配置文件 ApplicationContext ac = new ClassPathXmlApplicationContext("ApplicationContext.xml"); //获取bean对象 Demo us = (Demo) ac.getBean("us"); //调用方法 us.hello(); } }
第三章:Spring IOC容器
1. 什么是IOC
IOC -- Inverse of Control,控制反转,将对象的创建权力反转给Spring框架!
在java当中一个类想要使用另一个类的方法,就必须在这个类当中创建这个类的对象,那么可能会出现如下情况, 比如A类当中创建着B对象,B类当中有C对象,C类当中有A对象,这个如果一个类出了问题,那么可能会导致这个框架出现问题。 Spring 将创建对象的权利给了IOC,在IOC当中创建了ABC三个对象吗,那么我们我们其他的类只需要调用集合, 大大的解决了程序耦合性的问题。
控制反转(Inversion of Control,缩写为IoC),是面向对象编程中的一种设计原则,可以用来减低计算机代码之间的耦合度。
解决问题:使用IOC可以解决程序耦合性高的问题。
2. IOC容器的底层原理
IOC的实现,依赖于以下3门技术
① dom4j解析xml文档;
② 工厂模式;
③ 采用反射设计模式创建对象
首先我们需要讲一下什么是工厂模式
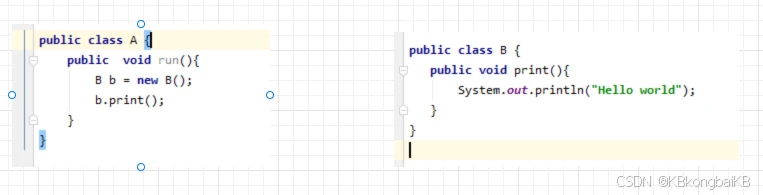 在当前情况之下A类想要调用B类就必须自己在自己的内部新建B类的对象,这样的耦合度太高,那我们如何降低耦合度的呢?
 创建一个工厂类,这样就能够使得A和B的耦合度降低到最小值
那么上边提到的三种技术如何实现IOC的呢?
第一步:xml配置文件,配置创建对象
<bean id="demo" class="com.qcby.service.Demo" />
第二步:创建工厂类
public class DemoFactory { //利用dom4j得到name所对应的value值 public static Demo getDemo() throws Exception { //利用dom4j得到name所对应的value值 String value="class路径"; //通过反射创建对象 Class clazz = Class.forName(value); //返回并创建demo对象 return (Demo) clazz.newInstance(); } }
通过以上两步,我们基本上就可以得到我们所创建的对象。
3.IOC(接口)
1.IOC思想是基于IOC容器完成的,IOC的底层就是对象工厂
2.Spring里边提供了IOC容器的实现的两种方式
(1) BeanFactroy:IOC容器是Spring内部的使用接口,不提供给开发人员使用
 * BeanFactroy:加载配置文件的时候不会去创建对象,在使用对象的时候才会去创建对象
(2)ApplicationContext:BeanFactory接口的子接口,提供了更多更强大的功能,一般由开发人员进行使用
 *加载配置文件的时候会把对象创建
第四章:Spring框架的Bean管理
(1).什么是Bean个管理
bean管理指的是如下的两个操作。
1.创建对象 2.注入属性
(2).Bean管理操作的两种方式
1.基于xml配置文件的方式实现 2.基于注解方式实现
(3).基于xml配置文件的方式实现Bean管理和注入属性
1.基于xml方式创建对象
①:这个就是我们上边配置过 ②:创建对象的时候,默认是执行无参构造方法完成对象
 2.基于xml方式注入属性
- 依赖注入的概述
IOC和DI的概念
IOC:Inverse of Control,控制反转,将对象的创建权反转给Spring!!
DI:Dependency Injection,依赖注入,就是注入属性
- 属性的set方法注入值
编写属性,提供该属性对应的set方法,编写配置文件完成属性值的注入
public class User { // 编写成员属性,一定需要提供该属性的set方法 //IOC容器底层就通过属性的set方法方式注入值 private int age; private String name; private Demo demo; public void setAge(int age) { this.age = age; } public void setName(String name) { this.name = name; } public void setDemo(Demo demo) { this.demo = demo; } @Override public String toString() { return "User{" + "age=" + age + ", name='" + name + ''' + ", demo=" + demo + '}'; } }
<!‐‐DI:依赖注入‐‐> <bean id="user" class="com.qcby.service.User" > <!--使用property完成属性注入 name:类里面属性名称 value:向属性注入值 ref:对象映射--> <property name="age" value="18"></property> <property name="name" value="张三"></property> <property name="demo" ref="demo"></property> </bean> <bean id="demo" class="com.qcby.service.Demo" />
@Test public void run1(){ //创建spring工厂,加载配置文件 ApplicationContext ac = new ClassPathXmlApplicationContext("ApplicationContext.xml"); //获取bean对象 User user = ac.getBean("user", User.class); System.out.println(user.toString()); }
- 数组,集合(List,Set,Map)等的set注入
public class CollectionBean { private String [] strs; private List<String> list; private Map<String,String> map; public void setStrs(String[] strs) { this.strs = strs; } public void setList(List<String> list) { this.list = list; } public void setMap(Map<String, String> map) { this.map = map; } @Override public String toString() { return "CollectionBean{" + "strs=" + Arrays.toString(strs) + ", list=" + list + ", map=" + map + '}'; } }
<!‐‐给集合属性注入值‐‐> <bean id="collectionBean" class="com.qcby.service.CollectionBean"> <property name="strs"> <array> <value>美美</value> <value>小凤</value> </array> </property> <property name="list"> <list> <value>熊大</value> <value>熊二</value> </list> </property> <property name="map"> <map> <entry key="aaa" value="老王"/> <entry key="bbb" value="小王"/> </map> </property> </bean>
- 属性构造方法方式注入值
对于类成员变量,构造函数注入。
public class Car { // 名称 private String cname; // 金额 private Double money; public Car(String cname,Double money){ this.cname = cname; this.money = money; } @Override public String toString() { return "Car{" + "cname='" + cname + ''' + ", money=" + money + '}'; } }
<bean id="car" class="com.qcby.service.Car"> <constructor-arg name="cname" value="奔驰"></constructor-arg> <constructor-arg name="money" value="35"></constructor-arg> </bean>
@Test public void run(){ //创建spring工厂,加载配置文件 ApplicationContext ac = new ClassPathXmlApplicationContext("ApplicationContext.xml"); //获取bean对象 Car car = ac.getBean("car", Car.class); System.out.println(car.toString()); }
- 数组,集合(List,Set,Map)等的构造器注入
private String[] Strings; private List<String> list; private Map<String,String> map; public UserService( String[] Strings, List<String> list, Map<String, String> map) { this.Strings = Strings; this.list = list; this.map = map; }
<bean id="user" class="com.qcby.service.UserService"> <constructor-arg index="0"> <array> <value>aaa</value> <value>bbb</value> <value>ccc</value> </array> </constructor-arg> <constructor-arg index="1"> <list> <value>小黑</value> <value>小白</value> </list> </constructor-arg> <constructor-arg index="2"> <map> <entry key="aaa" value="小黑"/> <entry key="bbb" value="小号"/> </map> </constructor-arg> </bean>
@Test public void getValue(){ ApplicationContext applicationContext = new ClassPathXmlApplicationContext("applicationContext.xml"); Demo demo = (Demo) applicationContext.getBean("demo"); System.out.println(demo.toString()); }
(4).基于注解的方式实现Bean管理和注入属性
1.什么是注解
①:注解是代码特殊标记,格式:@注解名称(属性名称=属性值,属性名称=属性值...)
②:使用注解,注解作用在类上面,方法上面,属性上边
③:使用注解的目的:简化XML配置
2.Spring针对Bean管理中创建对象提供的注解
@Component 普通的类
@Controller 表现层
@Service 业务层
@Repository 持久层
*上边四个功能一样,都可以用来创建bean实例
3.用注解的方式创建对象
①:编写接口和实现类
package com.qcby.testanno; public interface UserService { public void hello(); }
②:在需要管理的类上添加@Component注解
package com.qcby.testanno; import org.springframework.stereotype.Component; /* <bean id="us" class="UserServiceImpl"/> */ / * 组件,作用:把当前类使用IOC容器进行管理,如果没有指定名称,默认使用类名,首字母是小写。 * userServiceImpl。或者自己指定名称 / @Controller(value="us") public class UserServiceImpl implements UserService { public void hello() { System.out.println("使用注解,方便吧!"); } }
③:编写配置文件,重点是开启注解扫描。
<?xml version="1.0" encoding="UTF-8"?> <beans xmlns="http://www.springframework.org/schema/beans" xmlns:xsi="http://www.w3.org/2001/XMLSchema-instance" xmlns:context="http://www.springframework.org/schema/context" xsi:schemaLocation=" http://www.springframework.org/schema/beans http://www.springframework.org/schema/beans/spring-beans.xsd http://www.springframework.org/schema/context http://www.springframework.org/schema/context/spring-context.xsd"> <!--开启注解扫描 com.qcby所有的包中的所有的类--> <context:component-scan base-package="com.qcby"/> </beans>
编写测试方法
package com.qcby.test; import com.qcby.testanno.UserService; import org.junit.Test; import org.springframework.context.support.ClassPathXmlApplicationContext; public class Demo2 { @Test public void run1(){ ClassPathXmlApplicationContext ac = new ClassPathXmlApplicationContext("ApplicationContextanno.xml"); UserService us = (UserService) ac.getBean("us"); us.hello(); } }
4.用注解的方实现属性注入
@Value 用于注入普通类型(String,int,double等类型)
@Autowired 默认按类型进行自动装配(引用类型)
@Qualifier 不能单独使用必须和@Autowired一起使用,强制使用名称注入
@Resource Java提供的注解,也被支持。使用name属性,按名称注入
具体的代码如下
// 默认当前类名就是ID名称,首字母小写 @Component(value = "c") // @Controller // @Service(value = "c") // @Repository(valu = "c") public class Car { // 注解注入值,属性set方法是可以省略不写的。 // 只有一个属性,属性的名称是value,value是可以省略不写的 @Value("大奔2") private String cname; @Value(value = "") private Double money; // 也不用提供set方法 // 按类型自动装配的注解,和id名称没有关系 @Autowired // 按id的名称注入,Qualifier不能单独使用,需要Autowired一起使用。 // @Qualifier(value = "person") // @Resource Java提供的注解,按名称注入对象,属性名称是name // @Resource(name = "person") private Person person; @Override public String toString() { return "Car{" + "cname='" + cname + ''' + ", money=" + money + ", person=" + person + '}'; } }
@Controller //@Component(value = "person") public class Person { @Value("张三") private String pname; @Override public String toString() { return "Person{" + "pname='" + pname + ''' + '}'; } }
@Test public void run1(){ // 工厂 ApplicationContext ac = new ClassPathXmlApplicationContext("applicationContext.xml"); // 获取对象 Car car = (Car) ac.getBean("c"); System.out.println(car); }
(5). IOC纯注解的方式
纯注解的方式是微服务架构开发的主要方式,所以也是非常的重要。纯注解的目的是替换掉所有的配置文件。但是需要编写配置类。
常用的注解总结
@Configuration 声明是配置类
@ComponentScan 扫描具体包结构的
编写实体类
@Component public class Order { @Value("北京") private String address; @Override public String toString() { return "Order{" + "address='" + address + ''' + '}'; } }
编写配置类,替换掉applicationContext.xml配置文件
@Configuration // 扫描指定的包结构 @ComponentScan(value = "com.qcby") public class SpringConfig { }
测试方法的编写
package com.qcby.test; import com.qcby.demo4.Order; import com.qcby.demo4.SpringConfig; import org.junit.Test; import org.springframework.context.ApplicationContext; import org.springframework.context.annotation.AnnotationConfigApplicationContext; public class Demo4 { @Test public void run(){ // 创建工厂,加载配置类 ApplicationContext ac = new AnnotationConfigApplicationContext(SpringConfig.class); // 获取到对象 Order order = (Order) ac.getBean("order"); System.out.println(order); } }
到此这篇spring 教程(spring教程 w3cschool)的文章就介绍到这了,更多相关内容请继续浏览下面的相关推荐文章,希望大家都能在编程的领域有一番成就!版权声明:
本文来自互联网用户投稿,该文观点仅代表作者本人,不代表本站立场。本站仅提供信息存储空间服务,不拥有所有权,不承担相关法律责任。
如若内容造成侵权、违法违规、事实不符,请将相关资料发送至xkadmin@xkablog.com进行投诉反馈,一经查实,立即处理!
转载请注明出处,原文链接:https://www.xkablog.com/rfx/13356.html