课堂目标
- create-react-app使用[创建react的应用]
- 掌握组件使用
- 掌握JSX语法
- 掌握setState
- 理解事件处理 组件生命周期
- 掌握组件通信各种方式
资源
- react
- create-react-app:https://facebook.github.io/create-react-app.dev/docs/getting-started
前期准备
给vscode安装:Auto Import插件
安装官方脚手架
全局安装
npm install -g create-react-app创建项⽬
create-react-app lesson1启动项⽬
npm start暴露配置项
- 暴露配置项 以便改进配置项
npm run eject⽂件结构⼀览
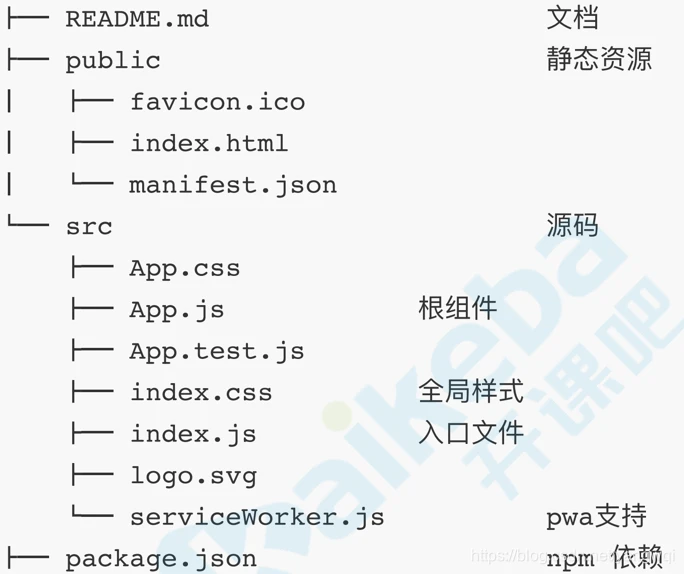
env.js⽤来处理.env⽂件中配置的环境变量
config/env.js 处理当前配置项
// node运⾏环境:development、production、test等 const NODE_ENV = process.env.NODE_ENV; // 要扫描的⽂件名数组 const dotenvFiles = [ `${paths.dotenv}.${NODE_ENV}.local`, NODE_ENV !== 'test' && `${paths.dotenv}.local`, `${paths.dotenv}.${NODE_ENV}`, paths.dotenv, // .env ].filter(Boolean); // 从.env*⽂件加载环境变量 dotenvFiles.forEach(dotenvFile => { if (fs.existsSync(dotenvFile)) { require('dotenv-expand')( require('dotenv').config({ path: dotenvFile, }) ); } });实践⼀下,修改⼀下默认端⼝号,创建.env⽂件
PORT=8080config/webpack.config.js是webpack配置⽂件 开头的常量声明可以看出cra能够⽀持ts sass及css模块化
// Check if TypeScript is setup const useTypeScript = fs.existsSync(paths.appTsConfig); // style files regexes const cssRegex = /\.css$/; const cssModuleRegex = /\.module\.css$/; const sassRegex = /\.(scss|sass)$/; const sassModuleRegex = /\.module\.(scss|sass)$/; const paths = require('./paths'); plugins: [ new HtmlWebpackPlugin( Object.assign( { inject: true, template: paths.appHtml,//template配置项 }, ) ), }React和ReactDom
React负责逻辑控制: 数据 -> VDOM
- React使⽤JSX来描述UI
- JSX用到React的内置函数React.createElement及babel-loader将jsx转成js能识别的内容 所以用到JSX就要引入React不然报错
ReactDom渲染实际DOM:VDOM -> DOM将虚拟DOM变为真实DOM【通过render函数渲染到真实DOM页面中】
删除src下⾯所有代码,新建index.js
import React from 'react'; import ReactDOM from 'react-dom'; // 这⾥怎么没有出现React字眼? // JSX => React.createElement(...) JSX底层用到了React.createElement(...)函数 const jsx = <h2>Hello React</h2>; ReactDOM.render(jsx,document.getElementById('root'));webpack.config.js【⼊⼝⽂件定义】
entry: [ // WebpackDevServer客户端,它实现开发时热更新功能 isEnvDevelopment && require.resolve('react-dev utils/webpackHotDevClient'), // 应⽤程序⼊⼝:src/index paths.appIndexJs, ].filter(Boolean),JSX
PS:JSX写法和html文件一样
- JSX是⼀种JavaScript的语法扩展,其格式⽐较像模版语⾔,但事实上完全是在JavaScript内部实现的。
- JSX可以很好地描述UI,能够有效提⾼开发效率,体验JSX
- JSX实质就是React.createElement的调⽤,最终的结果是React“元素”(JavaScript对象)【JSX用到React的内置函数React.createElement及babel-loader将jsx转成js能识别的内容 所以用到JSX就要引入React不然报错】
const jsx = <h2>react study</h2>; ReactDOM.render(jsx,document.getElementById('root'));使⽤JSX
变量使用:表达式{}的使⽤包裹变量
index.js
const name = "react study"; const jsx = <h2>{name}</h2>;函数使用:函数也是合法表达式 可看作一个变量使用 使用方式同上
index.js
const user = { firstName: 'tom', lastName: 'jerry' } function formatName(user) { return user.firstName + ' ' + user.lastName } const jsx = <h2>{formatName(user)}</h2>对象的使用:jsx是js对象 也是合法表达式
index.js
const greet = <p>hello, Jerry</p> const jsx = <h2>{greet}</h2>;条件表达式的使用:条件语句可以基于上⾯结论实现
index.js【短路原则】
const greet = <p>hello, Jerry</p> const show = false const jsx = ( <div> {/* 条件语句 */} {show && greet} {show ? greet : 'haha'} </div> )数组的使用:数组会被作为⼀组⼦元素对待,数组中存放⼀组jsx可⽤于显示列表数据
- 使用key的原因:虚拟DOM在进行diff时key是参考变量 先比较type值再比较key值 key不唯一的话 会分不清比较的对象 会出错
const arr = [1, 2, 3].map(num => <li key={num}>{num}</li>) const a = [0, 1, 2, 3]; const obj = [ { name: "Tom", age: 18, }, { name: "Kitty", age: 19, }, ]; const jsx = ( <div> {/* 数组 */} <ul>{arr}</ul> {arr.map} </div> <ul> {a.map((item, index) => { return <li key={"item" + index}>{item}</li>; })} </ul> <ul> {obj.map((item, index) => { return <li key={"item2" + index}>{item.name + "-" + item.age}</li>; })} </ul> )属性的使⽤:【图片资源等】
- 静态值⽤双引号
- 动态值⽤花括号 class、for等要特殊处理
import logo from './logo.svg' import "./index.css"; const jsx = ( <div> {/* 属性:静态值⽤双引号,动态值⽤花括号;class、for等要特殊处理。 */} <img src={logo} className="logo" style={
{ width: 100 }} className="img" /> </div> )css模块化:
- 给css文件加个module后缀 实现模块化
- class给了一个默认值 避免了重复的问题
index.js
import style from "./index.module.css"; <img className={style.img} />创建index.module.css
.img { width: 100px; }更多css modules规则参考
组件
组件:组件是抽象的独⽴功能模块 react应⽤程序由组件构建⽽成
react组件的两种形式:
- function组件[推荐函数式编程]
lesson1/src/App.js【创建一个简单的function组件】
import logo from './logo.svg'; import './App.css'; function App() { return ( <div className="App">app</div> ); } export default App;- class组件 使用时需要继承
pages/Home.js【创建一个简单的class组件】
import React, { Component } from "react"; export default class Home extends Component{ render() { return <div>Home</div> } }class组件和function组件的区别:
- class组件比function组件多引入了一个{ Component }类:
- 用class组件的话都要继承[extends]来自Component类中的状态(state),⽣命周期函数,render等
- extends继承:Component类中有什么内容class类可以继承自Component类并使用这些内容
- Component中有状态(state),⽣命周期函数,render等可以进行复用
- 用class组件的话都要继承[extends]来自Component类中的状态(state),⽣命周期函数,render等
- function组件组件本身没有state 也没有生命周期函数
class组件和function组件的使用选取原则:
- 需要用到复杂生命周期函数或者setState的时候用class组件 否则用function组件
- 组件复杂度没有这么高时 用function组件即可
class组件
class组件:通常拥有状态(state)和⽣命周期 继承于Component 实现render⽅法
提取前⾯jsx相关代码⾄pages/Home.js【Pages:放所有的页面】
import React, { Component } from 'react' import logo from '../logo.svg' import style from '../index.module.css' export default class Home extends Component { render() { const name = 'react study' const user = { firstName: 'tom', lastName: 'jerry' } function formatName(user) { return user.firstName + ' ' + user.lastName } const greet = <p>hello, Jerry</p> const arr = [1, 2, 3].map(num => <li key={num}>{num}</li>) return ( <div> {/* 条件语句 */} {name ? <h2>{name}</h2> : null} {/* 函数也是表达式 */} {formatName(user)} {/* jsx也是表达式 */} {greet} {/* 数组 */} <ul>{arr}</ul> {/* 属性 */} <img src={logo} className={style.img} alt="" /> </div> ) } }创建并指定src/App.js为根组件
import React, { Component } from 'react' import Home from './pages/Home' class App extends Component { render() { return ( <div> <Home></Home> </div> ) } } export default Appindex.js中使⽤App组件
import App from "./App"; ReactDOM.render(<App />, document.getElementById("root"));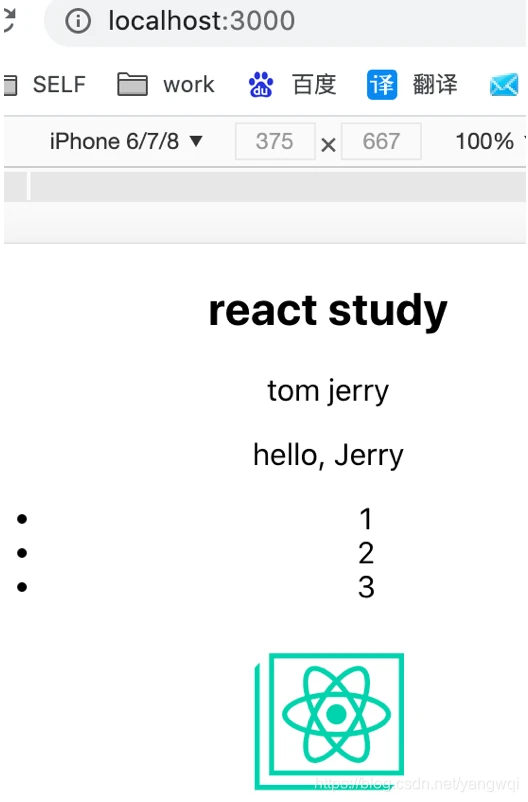
function组件
函数组件:
- 通常⽆状态,仅关注内容展示,返回渲染结果即可
- 从React16.8开始引⼊了hooks 函数组件也能够拥有状态state【通过React hooks函数组件也可以拥有状态】后⾯组件状态管理部分讨论
改造App.js
import React from 'react' import User from './pages/User' function App() { return ( <div> <User /> </div> ) } export default App组件状态管理
组件状态管理:如果组件中数据会变化 并影响⻚⾯内容 则组件需要拥有状态(state)并维护状态
类组件中的状态管理
class组件中的状态管理:
- 使⽤state和setState维护状态
- 使⽤setState⽅法更新状态
class组件实现定时器功能的实现方案:
- state方式定义date【Component中定义了state 继承到了】
- 定义constructor:构造函数
- super:超级 实现继承 将继承的变量都带过来后就可以用state
- componentDidMount中实现定时器:生命周期函数 组件挂载完成之后执行
- componentWillUnmount:生命周期函数 组件将要卸载时执行【当前组件不存在】
src/pages/Home.js【创建⼀个Clock】
import React, { Component } from 'react' export default class Home extends React.Component { // 定义constructor:构造函数 constructor(props) { super(props) // super超级 实现继承 将继承的变量都带过来后就可以用state // 使⽤state属性维护状态,在构造函数中初始化状态 this.state = { date: new Date() } } // 生命周期函数 组件挂载完成之后执行 componentDidMount() { // 组件挂载时启动定时器每秒更新状态 this.timerID = setInterval(() => { // 使⽤setState⽅法更新状态 this.setState({ date: new Date(), }) }, 1000) } componentWillUnmount() { // 组件卸载时停⽌定时器 clearInterval(this.timerID) } render() { return <div>{this.state.date.toLocaleTimeString()}</div> } }拓展:setState特性讨论【setState是同步的还是异步的】
setState:是异步放在setState中进行处理 简单来说就是放到了一个数组里然后最后一起取值
setState格式:
//可传两个参数变量 setState((state,props)=>{}) // 可传函数 setState((state,props)=>{},callback)⽤setState更新状态⽽不能直接修改
this.state.counter += 1; //错误的setState是批量执⾏的 因此对同⼀个状态执⾏多次只起⼀次作⽤ 多个状态更新可以放在同⼀个setState中进⾏:
Q:假如couter初始值为0,执⾏三次以后其结果是多少?是1
componentDidMount() { this.setState({ counter: this.state.counter + 1 }) this.setState({ counter: this.state.counter + 1 }) this.setState({ counter: this.state.counter + 1 }) }src/pages/Home.js
import React, { Component } from "react"; export default class Home extends Component { constructor(props) { super(props); this.state = { counter: 0, }; // 给setCounter的this绑定 不然setCounter会找不到this.setState 或者ES6的箭头函数可以解决this指向问题 // this.setCounter = this.setCounter.bind(this); } // 箭头函数 解决this.setState找不到的问题 setCounter = () => { this.setState({ counter: this.state.counter + 1, }); this.setState({ counter: this.state.counter + 3, }); console.log("state", this.state.counter); }; render() { const { counter } = this.state;//ES6解构赋值 直接取this.state中的date return ( <div> <p>{counter}</p> {/* 函数setCounter */} <button onClick={this.setCounter}>改变counter</button> </div> ); } }setCounter:控制台打印的结果是0 页面的执行结果是3
- 因为异步 控制台打印的结果是0【guess:先执行的普通js脚本后执行的this.setState】 页面的执行结果是第二次方法的执行结果3
- 只执行了第二个setState 即每次点击只+3

setState的3种实现同步的方式
setState通常是异步的 因此如果要获取到最新状态值有以下三种⽅式:
setState实现同步的修改方案一:传递函数给setState⽅法
- 函数传递状态的方式==》nextState实现同步更新【控制台未同步 页面执行同步了】
- 回调函数的方式进行处理nextState
- this.setState(nextState => {})中的nextState指上一个state
- 是异步 当前状态会被保存起来 再用的时候 用函数的话就会直接获取上一个状态的State
setCounter = () => { // nextState:存的state中的状态值 this.setState((nextState, props) => { return { counter: nextState.counter + 1, }; }); this.setState((nextState, props) => { return { counter: nextState.counter + 3, }; }); console.log("state", this.state.counter); };第一次执行结果是4 第二次执行结果是8:两个setState都执行了 分别+1+3即每次+4

setState实现同步的修改方案二:使⽤定时器
- setTimeout实现同步更新【控制台同步 页面执行也同步】
- setTimeout定时器是异步的
setCounter = () => { setTimeout(() => { this.setState({ counter: this.state.counter + 3, }); console.log("sta", this.state.counter); }, 0); };
setState实现同步的修改方案三:原⽣事件中修改状态
- 原生事件上进行绑定 实现同步更新【控制台同步 页面执行也同步】
componentDidMount() { // getElementsByTagName得到的是一个数组 document.getElementsByTagName("button")[0].addEventListener( "click", () => { this.setState({ counter: this.state.counter + 2, }); console.log("sta", this.state.counter); }, 0, ); // document.body.addEventListener('click', this.changeValue, false) } changeValue = () => { this.setState({ counter: this.state.counter + 7 }) console.log(this.state.counter) },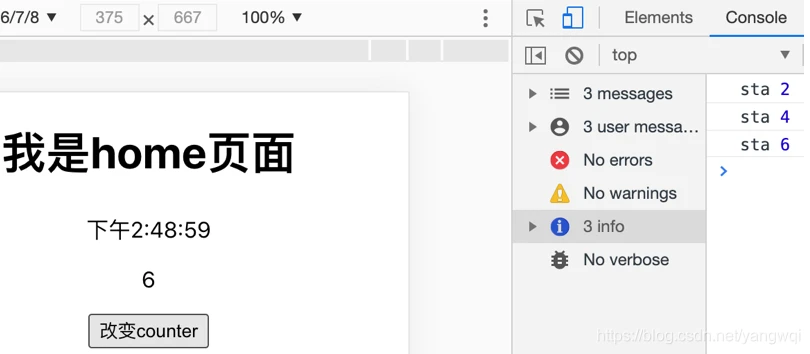
总结: setState只有在合成事件和钩⼦函数中是异步的,在原⽣事件和setTimeout、setInterval中都是同步的。
函数组件中的状态管理
function组件:
- function组件本身没有state 也没有生命周期函数[钩子]
- state特别庞大时建议用class组件
- 函数组件通过hooks[钩子]api维护状态
function组件实现定时器功能的实现方案:
- 引入useState及useEffect函数
src/pages/User.js【前面在class组件中实现了定时器的功能 now在function组件中实现定时器的功能】
import React, { useState, useEffect } from "react"; //hooks export default function User() { // const date = new Date(); const [date, setDate] = useState(new Date());//useState初始化值 const [date2, setDate2] = useState(new Date());//初始化值2 // useEffect动起来 useEffect(() => { const timerId = setInterval(() => { setDate(new Date()); }, 1000); return () => clearInterval(timerId);//组件卸载的时候清除定时器 }); return ( <div> <h1>我是user页面</h1> <p>{date.toLocaleTimeString()}</p> </div> ); }hooks api后⾯课程会继续深⼊讲解
事件回调函数注意绑定this指向,常⻅三种⽅法:
- 构造函数中绑定并覆盖:
this.change = this.change.bind(this)- ⽅法定义为箭头函数:
onChange={()=>this.change()}react是单向数据流 vue是双向数据流
React:react⾥遵循单项数据流 没有双向绑定 实现输⼊框要设置value和onChange 称为受控组件
Vue:vue是双向数据流 是语法糖
React事件处理
React的事件处理:React中使⽤onXX写法来监听事件 onClick onChange
src\pages\Search.js【例:⽤户输⼊事件】
import React, { Component } from "react"; export default class Search extends Component { /* state = {name: "",}; */ // 建议用constructor super形式 编译结果不一样 constructor(props) { super(props);//继承Component中的props this.state = { name: "", }; } // 使⽤箭头函数,不需要指定回调函数this,且便于传递参数 handle = () => { const { tellme } = this.props;// 解构赋值 取出tellme tellme("我是search"); console.log("handle"); }; change = event => { let value = event.target.value; // setState异步 this.setState({ name: value, }); console.log("change", this.state.name);//打印出上一次操作的结果 }; render() { const { name } = this.state; const { userInfo } = this.props.store; console.log("this", this); return ( <div> <h1>我是Search页面</h1> <p>{userInfo.userName}</p> <button onClick={this.handle}>click</button> <input value={name} onChange={this.change} /> </div> ); } }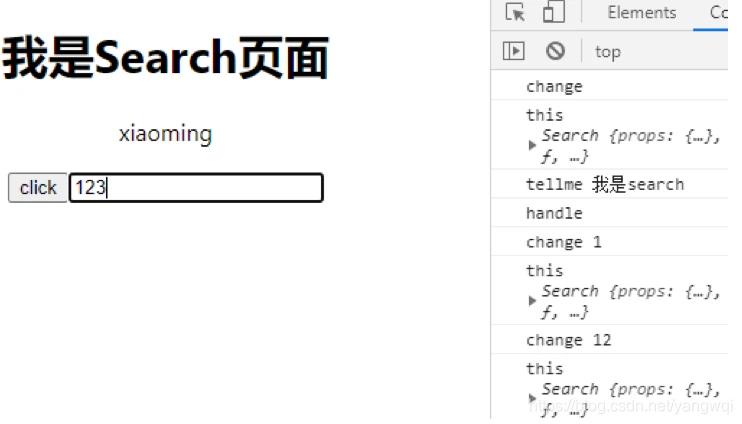
组件通信
- Props属性传递:Props属性传递可⽤于⽗⼦组件相互通信
// 父组件 index.js ReactDOM.render(<App title="开课吧真不错" />, document.querySelector('#root')); // 子组件 App.js <h2>{this.props.title}</h2>src\App.js
import React from "react"; import logo from "./logo.svg"; import "./App.css"; import Search from "./pages/Search"; const store = { userInfo: { userName: "xiaoming", }, }; function tellme(msg) { console.log("tellme", msg); } function App() { return ( <div className="App"> <Search store={store} tellme={tellme} /> </div> ); } export default App;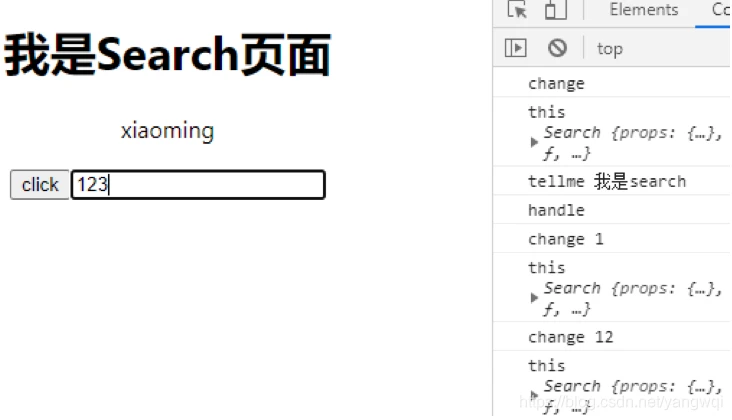
状态提升:如果⽗组件传递的是函数,则可以把⼦组件信息传⼊⽗组件,这个常称为状态提升
// StateMgt.js < Clock change = {this.onChange}/> // Clock this.timerID = setInterval(() = >{ this.setState({ date: new Date() }, () = >{ // 每次状态更新就通知⽗组件 this.props.change(this.state.date); }); },1000);- context【上下文】:跨层级组件之间通信【多层】
主要⽤于组件库开发中,后⾯组件化内容中详细介绍 建议不要在项目中滥用
- redux:类似vuex,⽆明显关系的组件间通信
后⾯全家桶部分详细介绍
React V16.3之前的⽣命周期
- defaultProps:默认参数 设置组件的默认属性
- constructor:构造函数 继承时用到super 定义状态值放在state中 设置组件的初始化状态
- componentWillMount():组件将要挂载之前 即将被废弃的声明周期
- render():组件渲染现在时态
- componentDidMount() :组件挂载之后 组件已经被渲染到页面中后触发
- componentWillUnmount():组件将要卸载之前
- componentWillUpdate():组件更新之前
- componentDidUpdate():组件更新之后
- componentWillUnmount():组件卸载之前
- shouldComponentUpdate():组件是否应该render 值是更新的只是没有render
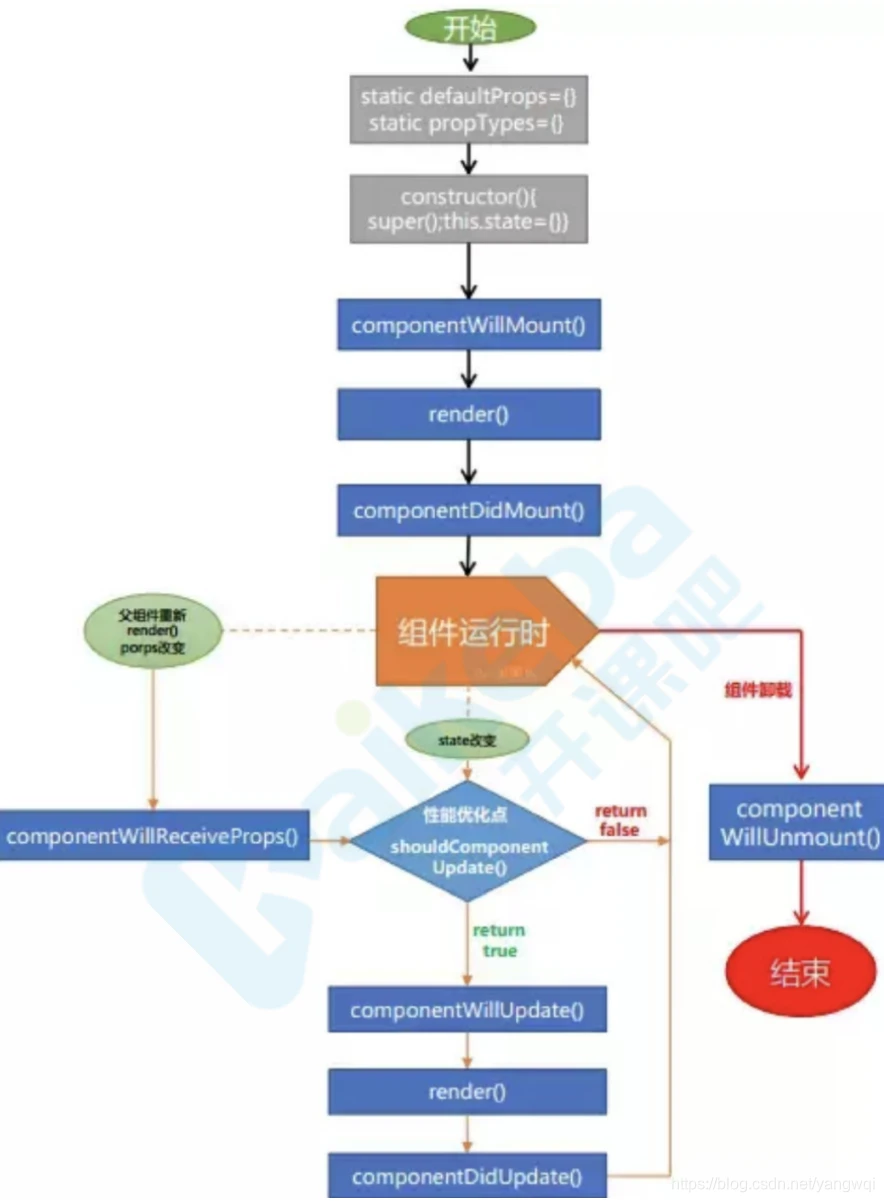
src\pages\LifeCycle.js【验证16.3版本的生命周期:写在class组件中】
import React, { Component } from "react"; export default class LifeCycle extends Component { constructor(props) { super(props); this.state = { counter: 0, }; console.log("执行constructor构造函数", this.state.counter); } // 组件将要挂载 挂载之前执行的内容 componentWillMount() { console.log("componentWillMount组件将要挂载", this.state.counter); } // 组件挂载之后 componentDidMount() { console.log("componentDidMount组件挂载之后", this.state.counter); } //组件卸载之前 componentWillUnmount() { console.log("componentWillUnmount", this.state.counter); } // 组件更新之前 componentWillUpdate() { console.log("componentWillUpdate更新之前", this.state.counter); } // 组件更新之后 componentDidUpdate() { console.log("componentDidUpdate更新之后", this.state.counter); } // 组件是否应该更新 更新局部 nextState更新后的值 shouldComponentUpdate(nextProps, nextState) { const { counter } = this.state;//更新之前的值 console.log("shouldComponentUpdate组件是否应该更新", counter, nextState.counter); return counter != 5;//不是5才执行更新 避免不必要的更新 } setCounter = () => { this.setState({ counter: this.state.counter + 1, }); }; // setState会重新render render() { const { counter } = this.state; console.log("render", counter); return ( <div> <h1>我是LifeCycle页面</h1> <p>{counter}</p> <button onClick={this.setCounter}>改变counter</button> {!!(counter % 2) && <Foo />} </div> ); } } // Foo组件 class Foo extends Component { componentWillUnmount() { //组件卸载之前 console.log(" Foo组件卸载之前 componentWillUnmount"); } render() { return <div>我是Foo组件</div>; } }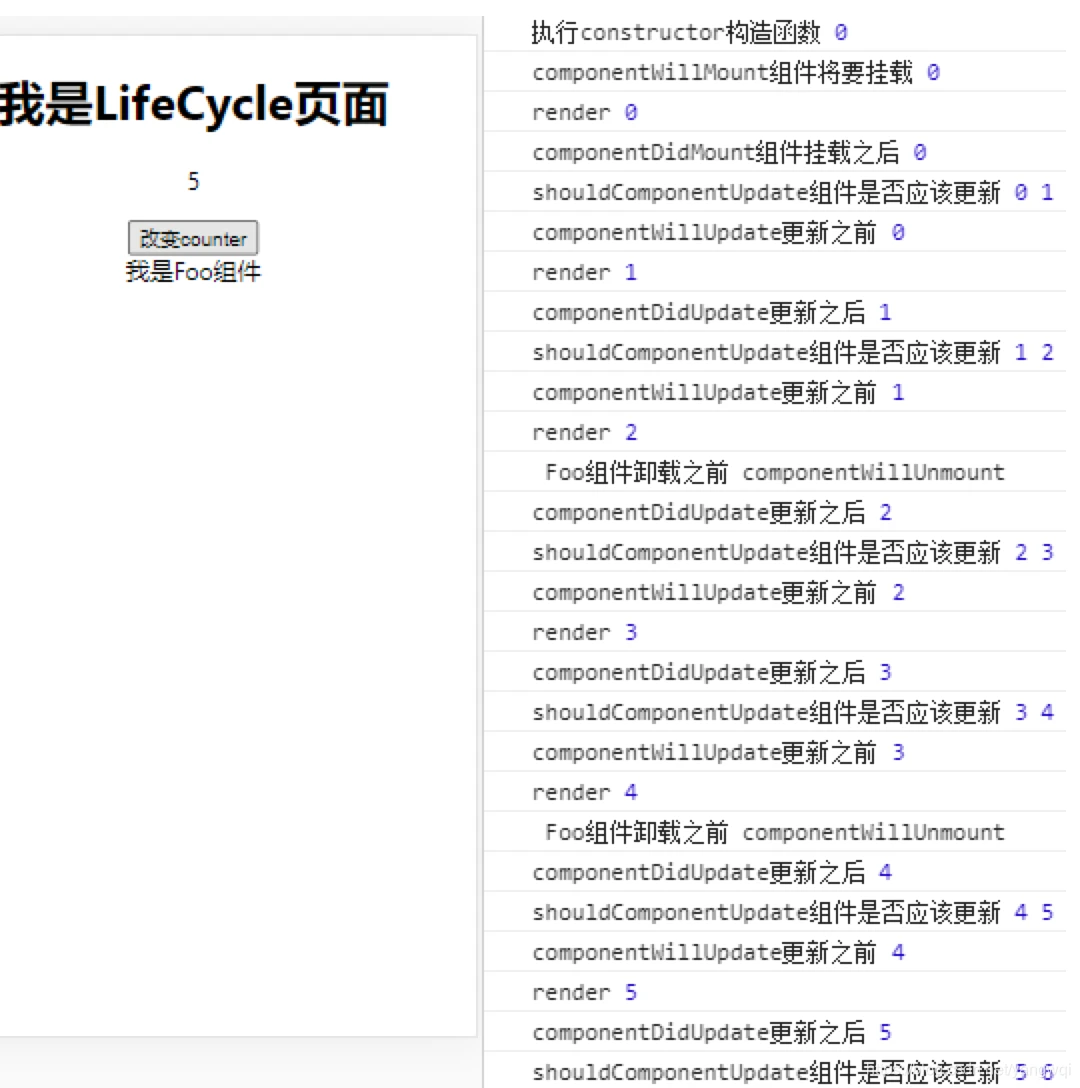
React V16.4之后的⽣命周期:
V17可能会废弃的三个⽣命周期函数:⽤getDerivedStateFromProps替代,⽬前使⽤的话加上UNSAFE_:
- componentWillMount使用示例:UNSAFE_componentWillMount()
- componentWillReceiveProps(nextProps)
- componentWillUpdate(nextProps, nextState)
引⼊两个新的⽣命周期函数:
- static getDerivedStateFromProps
- getSnapshotBeforeUpdate
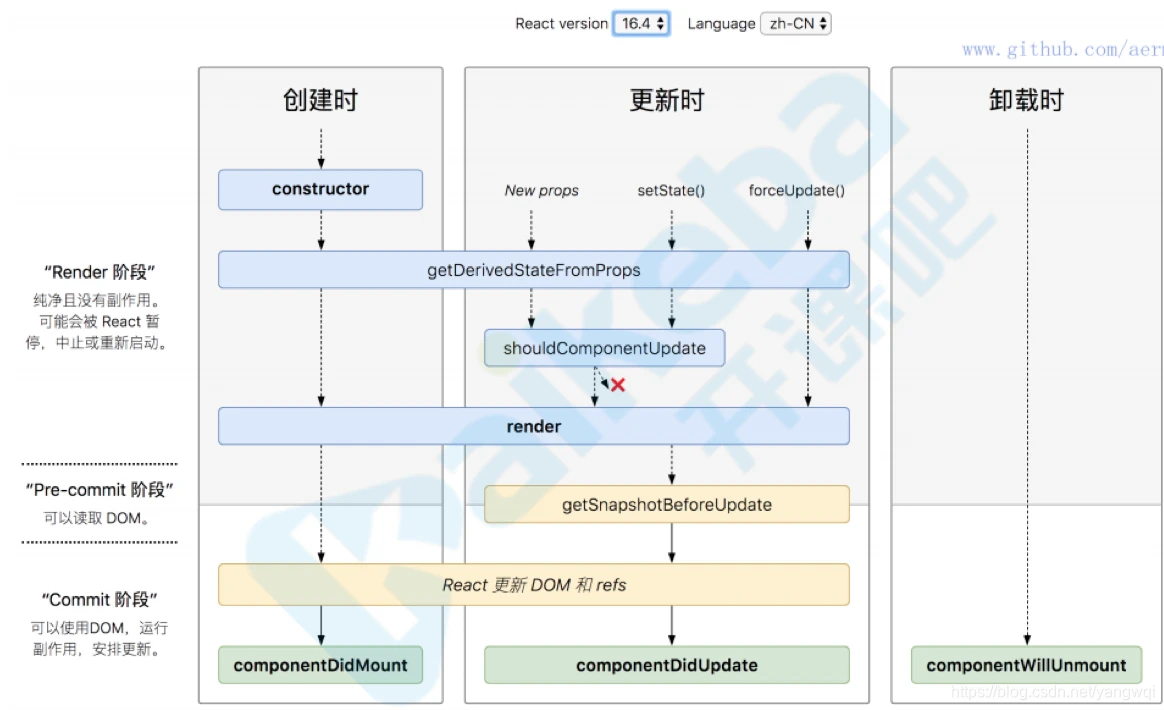
变更缘由:原来(React v16.0前)的⽣命周期在React v16推出的Fiber之后就不合适了,因为如果要开启async rendering,在render函数之前的所有函数,都有可能被执⾏多次。
原来(React v16.0前)的⽣命周期有哪些是在render前执⾏的呢?
- componentWillMount
- componentWillReceiveProps
- shouldComponentUpdate
- componentWillUpdate
如果开发者开了async rendering,⽽且⼜在以上这些render前执⾏的⽣命周期⽅法做AJAX请求的话,那AJAX将被⽆谓地多次调⽤。。。明显不是我们期望的结果。⽽且在componentWillMount⾥发起AJAX,不管多快得到结果也赶不上⾸次render,⽽且componentWillMount在服务器端渲染也会被调⽤到(当然,也许这是预期的结果),这样的IO操作放在componentDidMount⾥更
合适。
禁⽌不能⽤⽐劝导开发者不要这样⽤的效果更好,所以除了shouldComponentUpdate,其他在render函数之前的所有函数(componentWillMount,componentWillReceiveProps,
componentWillUpdate)都被getDerivedStateFromProps替代。
也就是⽤⼀个静态函数getDerivedStateFromProps来取代被deprecate的⼏个⽣命周期函数,就是强制开发者在render之前只做⽆副作⽤的操作,⽽且能做的操作局限在根据props和state决定新的state
React v16.0刚推出的时候,是增加了⼀个componentDidCatch⽣命周期函数,这只是⼀个增量式修改,完全不影响原有⽣命周期函数;但是,到了React v16.3,⼤改动来了,引⼊了两个新的⽣命周期函数。
新引⼊了两个新的⽣命周期函数:
- getSnapshotBeforeUpdate
- getDerivedStateFromProps
getDerivedStateFromProps会在调⽤ render ⽅法之前调⽤,并且在初始挂载及后续更新时都会被调⽤。它应返回⼀个对象来更新state,如果返回 null 则不更新任何内容。
请注意,不管原因是什么,都会在每次渲染前触发此⽅法。这与UNSAFE_componentWillReceiveProps形成对⽐,后者仅在⽗组件重新渲染时触发,⽽不是在内部调⽤ setState 时。链接
static getDerivedStateFromProps(props, state)React v16.3 的⽣命周期图
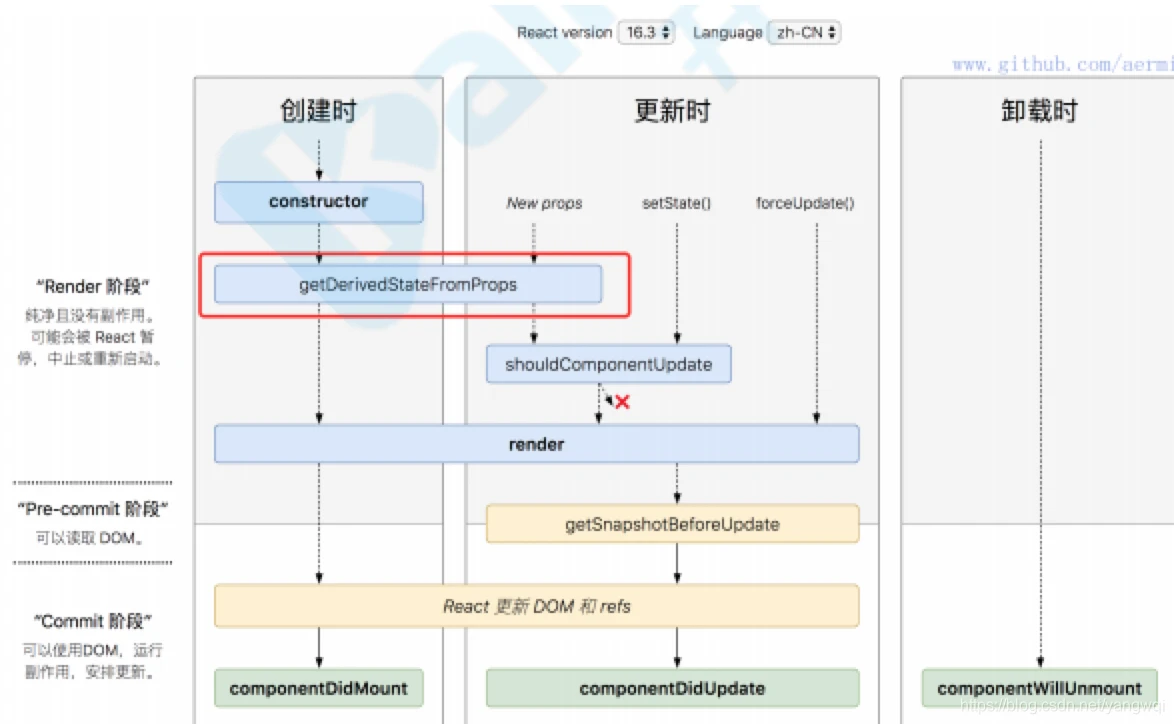
React v16.3:这样的话理解起来有点乱,在React v16.4中改正了这⼀点,让getDerivedStateFromProps⽆论是Mounting还是Updating,也⽆论是因为什么引起的Updating,全部都会被调⽤,具体可看Reactv16.4 的⽣命周期图。
React v16.4后的getDerivedStateFromProps
static getDerivedStateFromProps(props, state) 在组件创建时和更新时的render⽅法之前调⽤,它应该返回⼀个对象来更新状态,或者返回null来不更新任何内容。
getSnapshotBeforeUpdate
getSnapshotBeforeUpdate(prevProps, prevState)在render之后,在componentDidUpdate之前。getSnapshotBeforeUpdate()在最近⼀次渲染输出(提交到DOM 节点)之前调⽤。它使得组件能在发⽣更改之前从 DOM 中捕获⼀些信息(例如,滚动位置)。此⽣命周期的任何返回值将作为参数传递给 componentDidUpdate()。此⽤法并不常⻅,但它可能出现在 UI 处理中,如需要以特殊⽅式处理滚动位置的聊天线程等。应返回 snapshot 的值(或 null)。
官网给的例⼦
class ScrollingList extends React.Component { constructor(props) { super(props); this.listRef = React.createRef(); } getSnapshotBeforeUpdate(prevProps, prevState) { //我们是否要添加新的 items 到列表? // 捕捉滚动位置,以便我们可以稍后调整滚动. if (prevProps.list.length < this.props.list.length) { const list = this.listRef.current; return list.scrollHeight - list.scrollTop; } return null; } componentDidUpdate(prevProps, prevState, snapshot) { //如果我们有snapshot值, 我们已经添加了 新的items. // 调整滚动以⾄于这些新的items 不会将旧items推出视图。 // (这边的snapshot是 getSnapshotBeforeUpdate⽅法的返回值) if (snapshot !== null) { const list = this.listRef.current; list.scrollTop = list.scrollHeight - snapshot; } } render() { return ( < div ref = {this.listRef} > {/* ...contents... */} < /div> ); }在上述示例中,重点是从 getSnapshotBeforeUpdate 读取scrollHeight 属性,因为 “render” 阶段⽣命周期(如 render)和 “commit” 阶段⽣命周期(如 getSnapshotBeforeUpdate 和componentDidUpdate)之间可能存在延迟。
getDerivedStateFromError、componentDidCatch可以参考官⽹,内容很详细,此处不再赘述。
验证⽣命周期
范例:创建Lifecycle.js
import React, { Component } from 'react' /* V17可能会废弃的三个⽣命周期函数⽤getDerivedStateFromProps替代,⽬前使⽤的话加上UNSAFE_: - componentWillMount - componentWillReceiveProps - componentWillUpdate */ export default class LifeCycle extends Component { constructor(props) { super(props) this.state = { counter: 0, } console.log('constructor', this.state.counter) } static getDerivedStateFromProps(props, state) { // getDerivedStateFromProps 会在调⽤ render ⽅法之前调⽤, //并且在初始挂载及后续更新时都会被调⽤。 //它应返回⼀个对象来更新 state,如果返回 null 则不更新任何内容。 const { counter } = state console.log('getDerivedStateFromProps', counter) return counter < 8 ? null : { counter: 0 } } getSnapshotBeforeUpdate(prevProps, prevState) { const { counter } = prevState console.log('getSnapshotBeforeUpdate', counter) return null } /* UNSAFE_componentWillMount() { //不推荐,将会被废弃 console.log("componentWillMount", this.state.counter); } */ componentDidMount() { console.log('componentDidMount', this.state.counter) } componentWillUnmount() { //组件卸载之前 console.log('componentWillUnmount', this.state.counter) } /* UNSAFE_componentWillUpdate() { //不推荐,将会被废弃 console.log("componentWillUpdate", this.state.counter); } */ componentDidUpdate() { console.log('componentDidUpdate', this.state.counter) } shouldComponentUpdate(nextProps, nextState) { const { counter } = this.state console.log('shouldComponentUpdate', counter, nextState.counter) return counter !== 5 } setCounter = () => { this.setState({ counter: this.state.counter + 1, }) } render() { const { counter } = this.state console.log('render', this.state) return ( <div> <h1>我是LifeCycle⻚⾯</h1> <p>{counter}</p> <button onClick={this.setCounter}>改变 counter</button> {/* {!!(counter % 2) && <Foo />} */} <Foo counter={counter} /> </div> ) } } class Foo extends Component { UNSAFE_componentWillReceiveProps(nextProps) { //不推荐,将会被废弃 // UNSAFE_componentWillReceiveProps() 会在已挂载的组件接收新的 props 之前被调⽤ console.log('Foo componentWillReceiveProps') } componentWillUnmount() { //组件卸载之前 console.log(' Foo componentWillUnmount') } render() { return ( <div style={
  { border: 'solid 1px black', margin: '10px', padding: '10px' }}> 我是Foo组件 <div>Foo counter: {this.props.counter}</div> </div> ) } }
react16引入了异步渲染
生命周期按类型分:触碰时 更新时 卸载时
按阶段分:render阶段 pre-commit阶段 commit阶段
React核心入门
- 课堂目标
- 资源
- 起步
- 文件结构
- 文件结构一览
- React和ReactDOM
- JSX
- JSX使用
- 组件
- 组件的两种形式
- class组件
- function组件
- 组件状态管理
- 类组件中的状态管理
- 函数组件中的状态管理
- 组件的两种形式
- 事件处理
- 组件通信
- props属性传递
- context
- redux
- 生命周期
- 变更缘由
- 新引⼊了两个新的⽣命周期函数: getDerivedStateFromProps , getSnapshotBeforeUpdate
- getDerivedStateFromProps
- getSnapshotBeforeUpdate
- 验证⽣命周期
组件的设计思想
到此这篇1.React核心入门的文章就介绍到这了,更多相关内容请继续浏览下面的相关推荐文章,希望大家都能在编程的领域有一番成就!版权声明:
本文来自互联网用户投稿,该文观点仅代表作者本人,不代表本站立场。本站仅提供信息存储空间服务,不拥有所有权,不承担相关法律责任。
如若内容造成侵权、违法违规、事实不符,请将相关资料发送至xkadmin@xkablog.com进行投诉反馈,一经查实,立即处理!
转载请注明出处,原文链接:https://www.xkablog.com/yd-react-native/11105.html
